![]()
![]()
This section describes the procedure for using SSL certificates purchased from a Third Party which is a Certificate Authority (CA). Certificates from a CA would be needed when SapphireIMS is accessed from outside the organization's network. Certificates issued by a CA are considered trustworthy and confirms that the site is authentic. The following sections detail the steps involved in requesting for a certificate and setting up after they are received.
While in most cases the CA provides the certificate as a .crt file which is in PEM format, there may be situations where the certificate is provided as a .pfx file which is in PKCS#12 format.
If you already have a certificate as a .CRT file, then proceed to the section "Importing the .CRT certificates into the keystore".
If you already have a certificate as a .PFX file, then proceed to the section "Importing the .PFX certificate into the keystore".
If you need to obtain the certificate, proceed to the following section "Generating the Certificate Signing Request (CSR)".
 Note: Before proceeding,
stop the SapphireIMS service if it is running.
Note: Before proceeding,
stop the SapphireIMS service if it is running.
The CSR can be generated using either the 'keytool' utility which is part of the JDK (installed as part of SapphireIMS) or you can use the OpenSSL utility which you can download. While 'keytool' and 'openssl' are similar in functionality, the latter cannot work with Java Keystores (.JKS). Hence 'keytool' will be needed to finally create the Java Keystore. Depending on the utility you are using, proceed to one of the sections below.
OpenSSL can be used to generate the private key, the CSR file and then to combine the private key and CSR into a .PFX file. Download and install the OpenSSL utility.
Generate the private key using the following command
openssl genrsa -out [filename].key 2048
Generate the CSR file using the following command
openssl req -new -key [filename].key -out [filename].csr
You are prompted to enter the following fields
CN - Common Name or Host Name
OU - Organizational Unit
O - Organization Name
L - Locality
S - State
C - 2 letter country code
You are prompted to enter the key password. Enter a password or leave it blank
The CSR file (filename.csr) will be generated for sending to the CA.
Upon receipt of the certificate from the CA, the following command is run to generate a .PFX file
openssl pkcs12 -export -out [certificate].pfx -inkey [filename].key -in [csr].crt -certfile [intermediate].crt
where the CSR file is [csr].crt and [intermediate].crt is any intermediate certificate.
After the .pfx file is generated, follow the step in the next section to import the file into the Java Keystore.
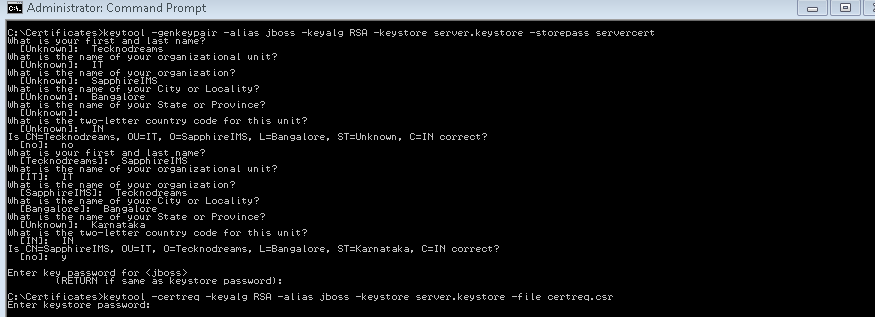
The 'keytool' program which is part of the Jave Runtime Environment is used for generating the keys and importing the certificates. On Windows add the following path which is the location of the keytool utility to the PATH variable
SapphireIMS\WebManagement\JDK\bin
A private key is generated using the following command
keytool -genkeypair -alias jboss -keyalg RSA -keystore [keystore file] -storepass [keystore password]
You are prompted to enter the following fields
CN - Common Name or Host Name
OU - Organizational Unit
O - Organization Name
L - Locality
S - State
C - 2 letter country code
You are prompted to enter the key password. Enter <Return> so that the same value as the keystore password is used. The keystore file needs to be stored safely.
Generate the Certificate Signing Request (CSR) using the following command for sending to the CA. A file 'certreq.csr' is generated.
keytool -certreq -keyalg 2048 -alias jboss -keystore [keystore file] -file certreq.cer
The CA provides the certificate in a .CER or .CRT file. This needs to be imported into the keystore create earlier. In addition any root and intermediate certificates provided by the CA also need to be imported into the keystore.
The sections below give the steps to import the certificates into a keystore. Depending on the certificate format, follow the steps in one of the two sections below.
Note: For more information
on the 'keytool' utility refer
to the Java SE documentation at https://docs.oracle.com/javase/10/tools/keytool.htm
Copy the certificate received from the CA into a local folder.
On Windows add the following path which is the location of the keytool utility to the PATH variable
SapphireIMS\WebManagement\JDK\bin
Open a command window as administrator and navigate to the path where the certificate file is stored.
Import the certificate into a Java keystore by typing the following command. Replace the names in [] with the name of your certificate file and the keystore.
keytool -importkeystore -srckeystore [certificate] -destkeystore [keystore file] -srcstoretype pkcs12
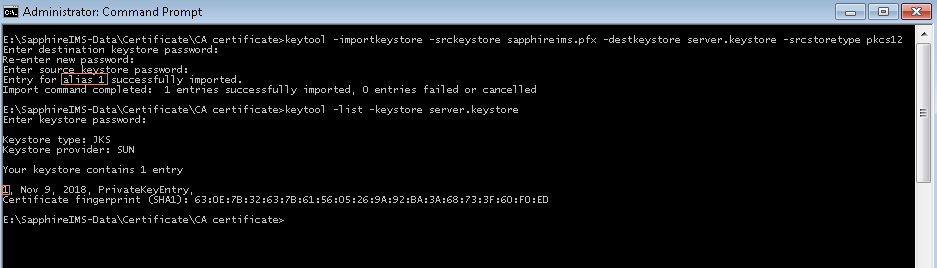
Make a note of the alias name as this is needed to complete the configuration. The alias is displayed once the import is successful. Alternatively the following command will display the alias. Replace the names in [] with the name of your keystore.
keytool -list -keystore [keystore file]
In the example above, the alias is 1.
Copy the keystore file in to the following path
SapphireIMS\WebManagement\standalone\configuration
Next you need to configure Jboss or Wildfly. Depending on the patch level you are using, follow the steps in one of the two sections below.
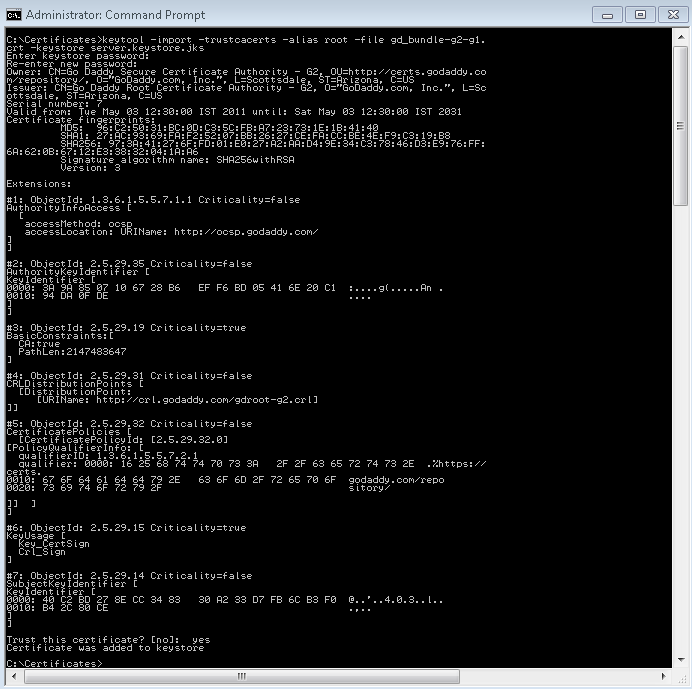
Copy the certificates received from the CA into a local folder. Copy the keystore file containing the private key which was created earlier into the same folder.
On Windows add the following path which is the location of the keytool utility to the PATH variable
SapphireIMS\WebManagement\JDK\bin
Open a command window as administrator and navigate to the path where the certificate files are stored.
Import the root certificate by typing the following command. Replace the names in [] with the name of your root certificate file and the keystore.
keytool -import -trustcacerts -alias root -file [root certificate] -keystore [keystore file]
You will be promoted for the password for the keystore which you had set earlier
Enter keystore password:
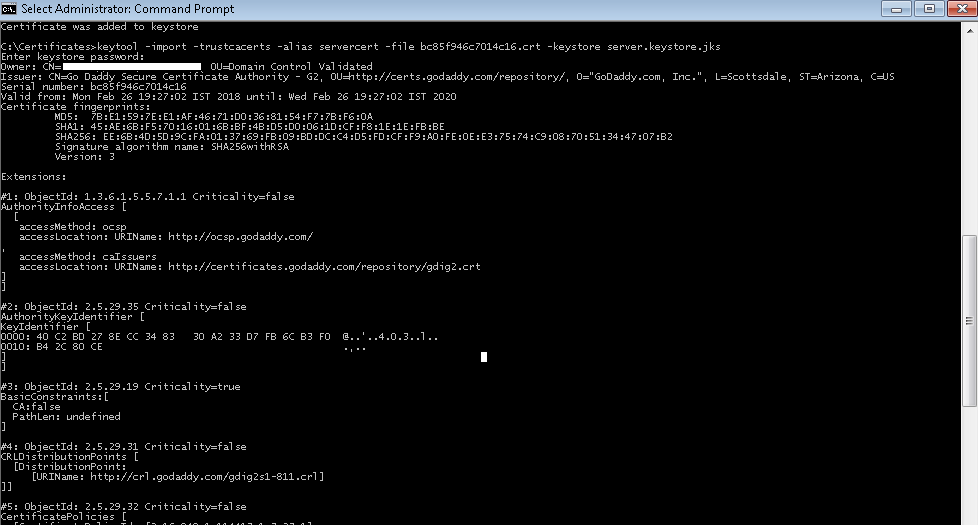
Import the intermediate certificate(s) by typing the following command. Replace the names in [] with the name of your intermediate certificate file and the keystore.
keytool -import -trustcacerts -alias intermediate -file [intermediate certificate] -keystore [keystore file]
You will be promoted for the password for the keystore which you had set earlier
Enter keystore password:

Import your SSL certificate(s) by typing the following command. Replace the names in [] with the name of your SSL certificate file and the keystore.
keytool -import -trustcacerts -alias jboss -file [ SSL certificate] -keystore [keystore file]
You will be promoted for the password for the keystore which you had set earlier
Enter keystore password:
Note: If the certificates
are in any other format you can use 'keytool'
to convert into .JKS (Java keystore) format.
Copy the keystore file in to the following path
SapphireIMS\WebManagement\standalone\configuration
Next you need to configure Jboss or Wildfly. Depending on the patch level you are using, follow the steps in one of the two sections below.
Open the 'standalone.xml' which is present in 'SapphireIMS\WebManagement\standalone\configuration' folder and make the following changes (the modified or added lines are in bold). In the following example, the keystore file name is 'server.keystore', the alias is 'jboss', password for the key and keystore is 'servercert'
<security-realm name="ManagementRealm"
<server-identities>
<ssl>
<keystore path="server.keystore" relative-to="jboss.server.config.dir" keystore-password="servercert" alias="jboss" key-password="servercert"/>
</ssl>
</server-identities>
<authentication>
<truststore path="server.truststore" relative-to="jboss.server.config.dir" keystore-password="servercert" />
<local default-user="$local"/>
<properties path="mgmt-users.properties" relative-to="jboss.server.config.dir"/>
</authentication>
</security-realm>
<subsystem xmlns="urn:jboss:domain:undertow:2.0">
<buffer-cache name="default"/>
<server name="default-server">
<http-listener name="default" socket-binding="http" redirect-socket="https" max-parameters="10000" max-post-size="2147483648"/>
<https-listener name="https" socket-binding="https" max-parameters="10000" max-post-size="2147483648" security-realm="ManagementRealm" allow-unescaped-characters-in-url="true" url-charset="UTF-8" />
Note: Ensure that the alias
name is exactly entered including any special characters like curly braces
etc.
Change the https port number to the desired value (in this case 443)
<socket-binding-group name="standard-sockets" default-interface="public" port-offset="${jboss.socket.binding.port-offset:0}">
<socket-binding name="http" port="80"/>
<socket-binding name="https" port="443"/>
From any browser, access the SapphireIMS portal by typing in the following
https://<hostname>
The SapphireIMS login screen appears. By clicking on the certificate information on the browser bar, you can get the certificate details.
Note: To ensure that all
communication is via https, it is advisable to redirect http to https
should the user inadvertently use http. Refer to the section on "Enabling
redirection from http to https" to configure the same.