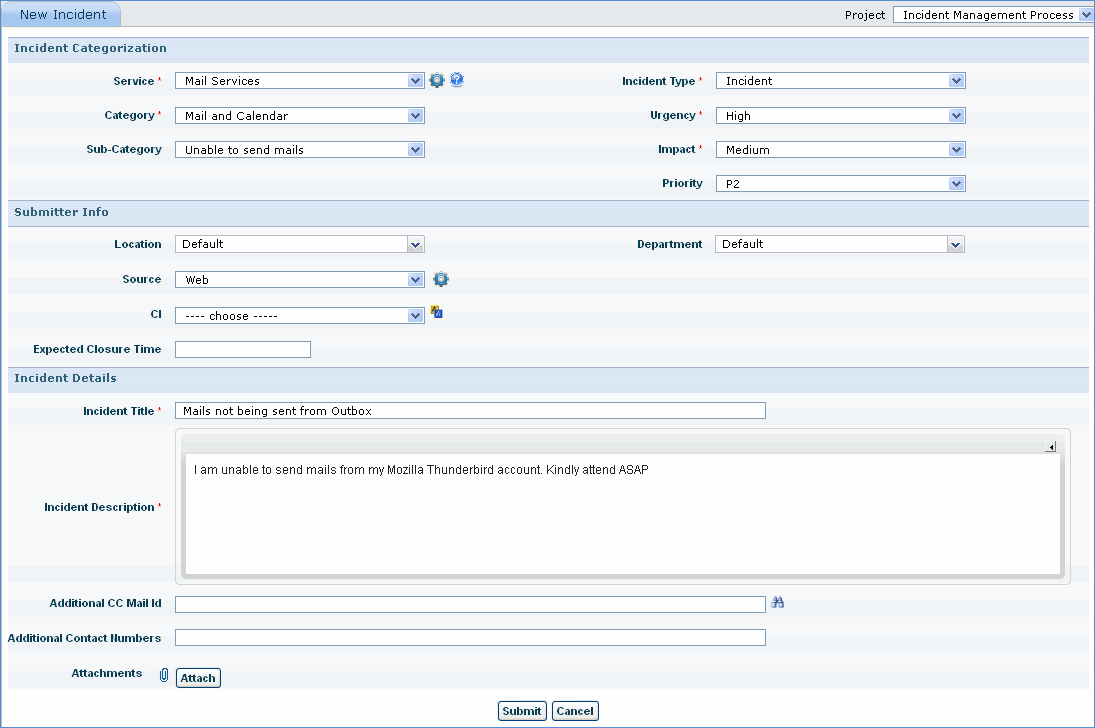
How to Submit Incident via Web ?
This section explains how to submit an incident.

To submit an
incident, on the service desk menu, point to 'Incident'
and click 'New Incident'
Fill in the
details in the 'New Incident' page as per the explanation given in
the table below and click 'Submit'
Sr. No |
Field
Name |
Description |
1 |
Service Desk Project |
Select
the service desk incident project |
2 |
Service, Category,
Sub Category |
Select
the 'Service', 'Category' and 'Sub Category' based on the type
of incident you want to submit
Note: Select
a service and click the icon ' ' to make the service as default service.
This is the user level default service and will take precedence
over project level default service ' to make the service as default service.
This is the user level default service and will take precedence
over project level default service
|
3 |
Incident Type |
Incident
Type can be 'Incident' or 'Major Incident'. For each incident
type, incident management follows a different workflow
|
4 |
Impact, Urgency, Priority |
Select
the 'Urgency', 'Impact' and 'Priority' from the drop down list
boxes based on how quickly you want the incident to be resolved
|
5 |
Location, Department |
Set
the config settings key 'Location/Department can be customized
by editing the settingkey' to enable or disable the fields
|
6 |
Source |
Select
the mode of submission. If 'Email' or 'Phone' is selected, select
the user who is responsible for ticket submission. If 'Bulk Call
Submission' is selected, select the CI. Please refer to CI
Details
Note:
1.Select a source and click the icon ''
to make the source as default source. This is the user level default
source and will take precedence over project level default source
2. If 'Email' or 'Phone' is selected,
you can create a new user by clicking on the 'Create New User'
icon
|
7 |
Asset or CI |
Please
refer to CI Details |
8 |
Incident Title |
Type
the incident title in the 'Incident Title'
'CC Mail Id' text box can be used
if the incident details needs to be copied to a person in particular
|
9 |
Incident Description |
Type
the description of the incident |
10 |
Work Group |
Work
group is automatically assigned to the ticket based on the work
group parameters. For more details, refer Work
Group. To enable automatic assignment of work group, set the
config settings key 'Enable/Disable automatic workgroup updation'
to 1
|
11 |
Symptoms |
Enter
the indication received for the incident |
12 |
Error Code |
Enter
the code to indicate severity of the incident |
13 |
Customer Reference Number |
Enter
the customer's incidents reference number (in case customer's
tracking tool is used) |
14 |
Attach |
'Attach'
helps you attach any additional supporting documents that might
be of any help to the support engineers
Note: 1.
To specify maximum file size
of attachment, change the Global Settings key value 'Max file
size(MB) allowed as attachment'
2. To provide
a custom path for storing attachments, enter a valid path for
the 'Setting Value' of the global settings variable 'Attachments
Path'. If the path is valid, attachments are saved here, else
they will be saved in the 'SapphireIMS Upload Files' folder
|
15 |
Submit |
Click
the 'Submit' button to submit the incident. A unique identifier
referred to as 'Incident ID' is generated on submitting a new
incident.
Note:
You can change the config setting key value 'Direct ticket assignment
after submitting the incident' to 1 for the incident to be automatically
redirected to the 'Change State' page. This option is only
available for users with 'Technician' role
|
|
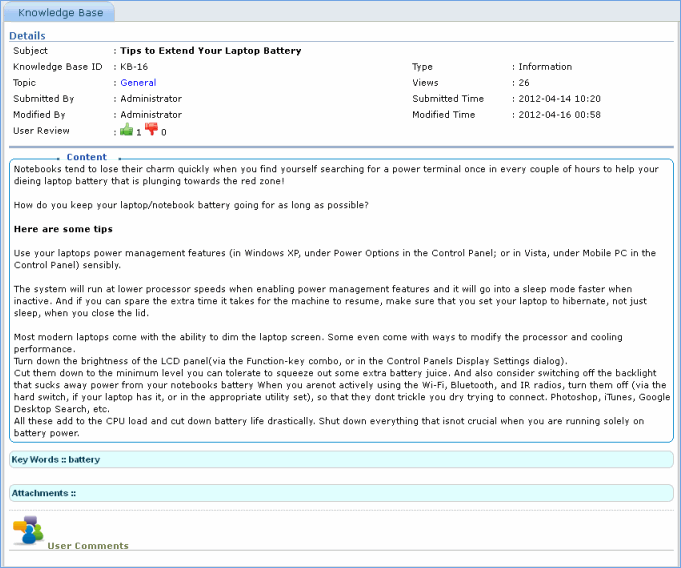
Viewing
Matching KB Articles This section lists the matching knowledge
base entries that can be referred to submit a similar incident. Click to view the details in the
same panel.
Matching
Quick Templates lists the templates for the selected service and
category. Click the template to load a pre-filled 'New Incident' form.
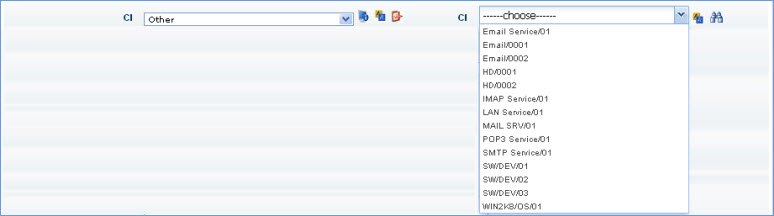
The asset or CI field
indicates the assets that are impacted due to this incident. You can choose
the asset or select 'Other'. When you select 'Other', the CI drop down
list box will be visible. Select the required asset from the CI field.
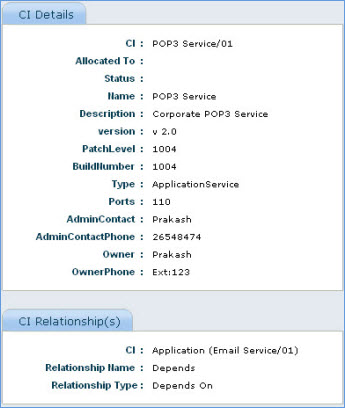
After selecting the CI, click this  icon to view the CI details.
The CI details are displayed as shown below
Notes:
When you select 'Other',
all CI items are listed in the drop down. To restrict asset access to
users, change the AssetList.properties file located in '<Install Directory>\WebManagement\standalone\deployments\SapphireIMS.war\WEB-INF\classes
1. Change the Role
ID or User ID
2. Change the query
based on the config settings key 'Display type of asset in the servicedesk
incidents'
3. Change BlockedAssets
value as 1 for excluding the blocked assets
Save the file and restart
the service. Now the assets are visible only to those users, with the
role ID or user ID configured.