![]()
![]()
Records in SapphireIMS can be linked to each other. Linking of records is a means of cross referencing. An example of use of this feature is to create a Problem Record from an Incident. An Incident needs to be resolved and quite often with a workaround which enables a service to be restored in the shortest time. A Problem record is created for a more permanent fix which addresses the underlying cause of the incident and linked to the Incident.
Another use is when there are a number of incidents raised by different users to report the same issue. In such a case all the incident records can be linked to one of them("master"). By enabling a configuration setting, it can cause the closure of all linked incidents when the "master" incident is closed.
To create linked records, you can either create a new record which is linked to the existing record or create a link between records which already exist. Records can be from the same or different projects.
You can create linked records within the same project too. For example, there could be multiple problem records which are related with the root cause being the same. You can link the problem records together.
Records can be linked to other records in projects of any type or restricted to be linked to other records in project of the same type. To control this, you can use the Project Setting 'Enable linking project to all project types'. If this is set to '0' the record can only be linked to others within the same project type and is set to '1' then it can be linked to records in any project type. By default this value is '0'. Refer to the topic Service Desk->Settings->General Settings->Project Settings for changing this setting.
Any linked records can be viewed from within the record. You can also view the linked record details including enclosures, attachments etc.
In the List view, click on the 'Link' button in the Actions menu. The count of the Linked records is displayed.

To view the list of linked records, click on 'Linked' record button. The linked records are displayed.

Click on any of the linked records. It expands to show the record details.
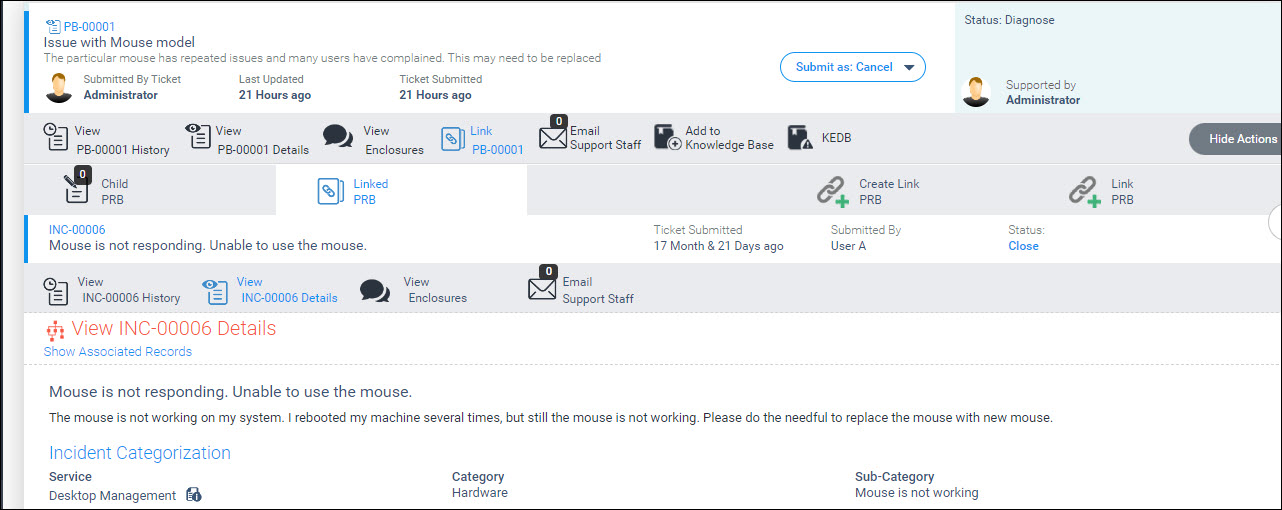
You can view the history, enclosures, attachments and also send Emails etc.
Click on the 'Link' button in the Actions menu if in the List View. If in the Grid View, go to the next step. The following menu is displayed in the List view.

Click on 'Create Link +'
option in the List View or click on ![]() option in the Grid View
to create a new record and link it.
option in the Grid View
to create a new record and link it.
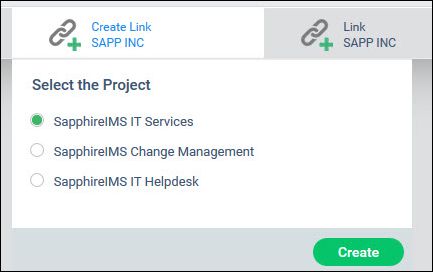
Select the project in which you want to create the linked record. For example, from an incident record if you want to create a service request record, select the relevant project. Note that only the projects which are present and for which you have access will be displayed. Click on 'Create'.
A new service request entry screen is displayed along with the record number where this record is linked. Enter the details and submit the service request.
Click on the 'Link' button in the Actions menu if you are in the List View. If in the Grid View, go to the next section. The following menu is displayed
Click on 'Link+' option in List View .

Select the 'Project' where you want to link the record. Select the record 'ID' to link. Click on 'Link'. The list with the linked records are displayed.

You can unlink a record at any time by clicking on  button.
Confirm by clicking on the confirmation button which appears. The
link will be removed. Note that in the case when the linked
record is created from another record, you need to go to the linked
record to remove the link. For example, if a service request is created
from an incident, you can remove the link from the service request.
button.
Confirm by clicking on the confirmation button which appears. The
link will be removed. Note that in the case when the linked
record is created from another record, you need to go to the linked
record to remove the link. For example, if a service request is created
from an incident, you can remove the link from the service request.
Click on ![]() option. The following screen is displayed.
option. The following screen is displayed.
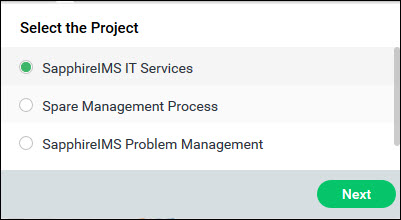
Select a project and click on 'Next'.
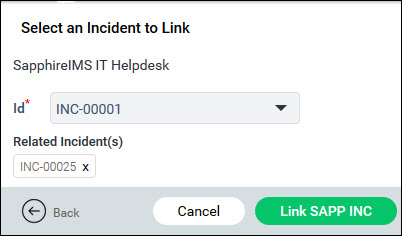
Select the record ID and click on 'Link'.
Unlinking records is the same as in the List view.
There are setting keys which control the behavior of state changes in linked records. These can be enabled such that when the master record reaches a particular state, other records will automatically change to a predefined state.
Set the 'Linked Record End State for Master Incident' to the state which should trigger related record state change. Refer Service Desk->Settings->General Settings->Project Settings for details.
Set the 'Linked Record End State for Related Incidents' to the state to which all related records should be moved.
As an example, if 'Linked Record End State for Master Incident' is set to 'Resolved' state and 'Linked Record End State for Related Incidents' is set to 'Close', then upon the Master record moving to 'Resolved' all the linked records will be moved to 'Close'.
 Note: In the case of linked
records, when the linked records are moved to the end state, the comment
of the main record is sent to submitters of linked records as notifications
if configured.
Note: In the case of linked
records, when the linked records are moved to the end state, the comment
of the main record is sent to submitters of linked records as notifications
if configured.