![]()
![]()
Profile Manager feature in SapphireIMS helps you to define profiles for the discovery. These profiles are used to collect data for the devices discovered in SapphireIMS.
A profile has to be created and configured in the discovery rule. The profile contains the type or protocol information used for data collection as well as the credentials needed to access the device. The creation of various types of profiles is described below
Following type of profile types are supported.
Device Profiles : used for discovery and data collection from devices
Application Profiles : used for data collection of performance data from supported applications
Cloud Profile : Collection of data of resources in the Azure cloud
Cloud Native Profile : Collection of data of resources hosted in the local network, specifically containers and container orchestration platforms.
In addition you can also define profiles for the following:
DHCP Scope - Define this profile if you need to include DHCP scope details as part of the discovery process. Refer DHCP Profiles for details.
Exclusion IP List - Define this profile if you need to exclude devices from the discovery process. Refer Exclusion Profiles for details.
Click on 'Settings' in the main tab. Under 'Inventory Management' section, click on 'Profile Manager'. The list of profiles is displayed.
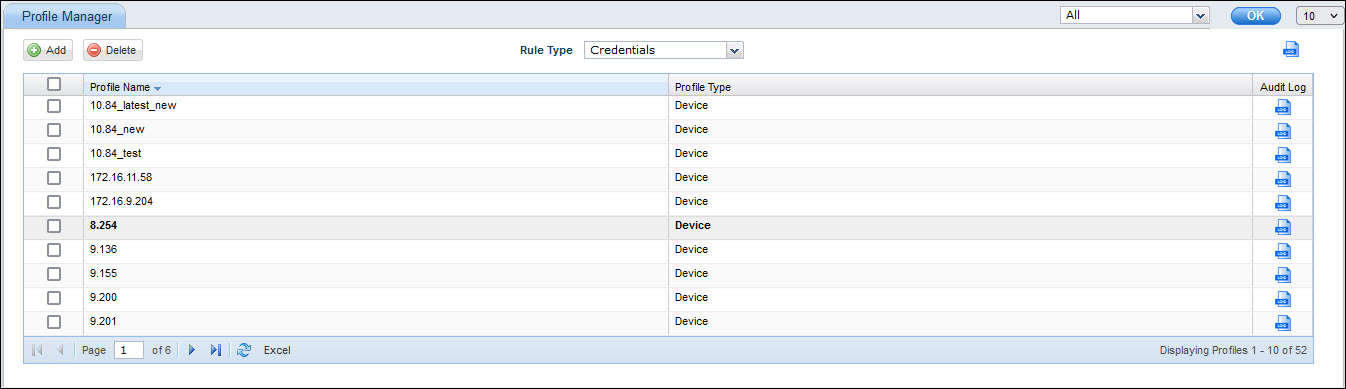
You can filter the profile by type which are those pertaining to 'Credentials', those pertaining to 'DHCP Scope' or those pertaining to 'Exclusion IP List'.
You can set the number of entries to be displayed on a page and navigate across pages.
To delete an entry, select the profile and click on 'Delete'.
Note: In case of Enterprise Plus edition, a drop down box for 'Site' selection allows viewing of profiles for a particular site.
Click on 'Add' to add a new profile or click on a profile to modify it.
The sections below describe each type of profile in detail.
The following data collection methods are supported when the profile type is selected as 'Device'.
WMI
SNMP
WBEM
SSH
Intel AMT **
VM
LDAP
FTP
CLI
Dell Wyse
In the case of storage devices, the data can be collected using either WBEM (SMI-S standard) or using CLI based on what is supported by the device. The profile can thus be appropriately created.
 **Note: Though Intel AMT
appears in the list, it is no longer supported and will be obsoleted in
future releases.
**Note: Though Intel AMT
appears in the list, it is no longer supported and will be obsoleted in
future releases.
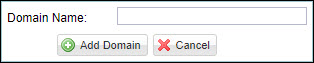
WMI data collection type is used for collecting data from Windows systems. To use this data collection type you need to specify the credentials with administrative privilege on the domain level (this will ensure data collection for all systems under that domain) or local system level (this will ensure data collection for all systems for which the credentials match). WMI type is also used for importing user information or authenticating from an AD server.
On clicking 'Add', the following screen is displayed.
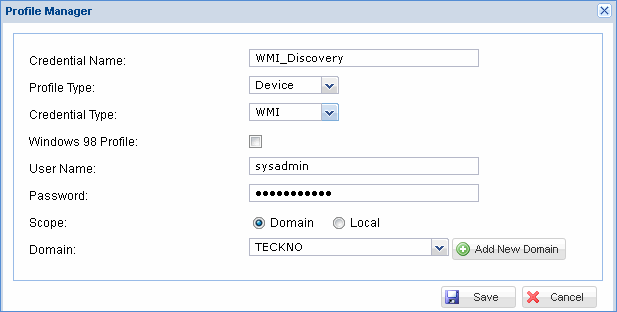
The fields are described in the following table.
|
Click 'Save' to save the configuration.
Repeat the process to add more WMI profiles.
SNMP data collection type is used for collecting data from systems (and devices like routers/switches) where SNMP service is enabled. To use this data collection type you need to specify the SNMP credentials (‘Read’ and ‘Write’ community strings)
On clicking 'Add', the following screen is displayed. The key parameters to be specified when a new SNMP credential profile is defined is given below.
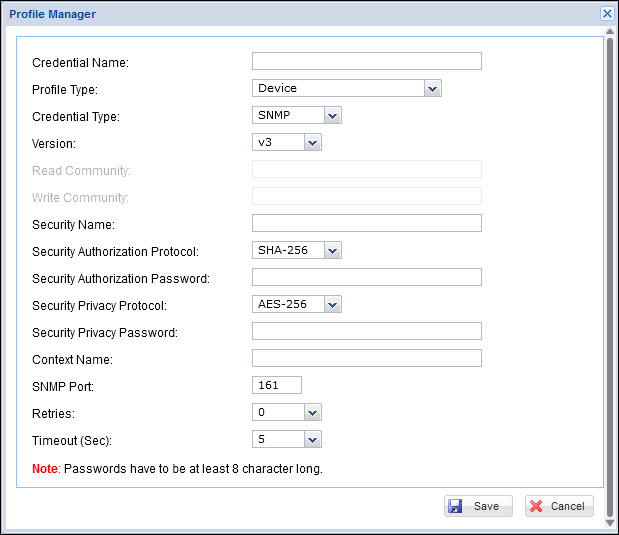
The fields are described in the following table.
|
Click 'Save' to save the configuration. The new credential profile defined is listed in the listing screen. If you need to add more SNMP profiles, repeat the above process.
WBEM data collection type is used for collecting data from UNIX systems where WBEM service is enabled. To use this data collection type you need to specify the WBEM credentials.
On clicking 'Add', the following screen is displayed. The key parameters to be specified when a new WBEM credential profile is defined is given below.
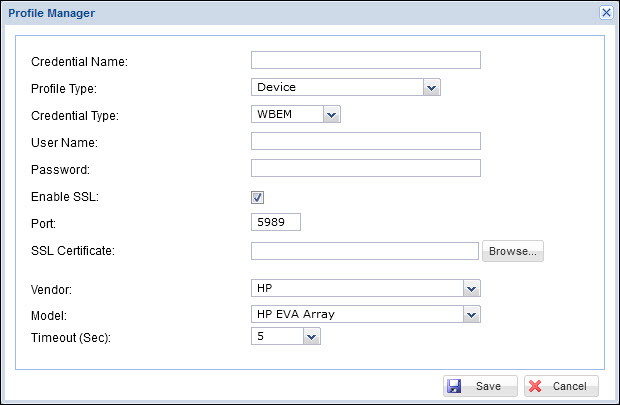
The fields are described in the following table.
|
Click 'Save' to save the configuration. The new credential profile defined is listed in the listing screen. If you need to add more WBEM profiles, repeat the above process.
Note: WBEM
is available as an in-built package on systems like Solaris, HP Raid
Array. SapphireIMS system also provides pre-compiled WBEM agents for
other operating systems like Linux. Refer
to the Appendix for more detail.
SSH data collection type is used for collecting data from UNIX systems where SSH service is enabled. To use this data collection type you need to specify the SSH credentials.
On clicking 'Add', the following screen is displayed. The key parameters to be specified when a new SSH credential profile is defined is given below.
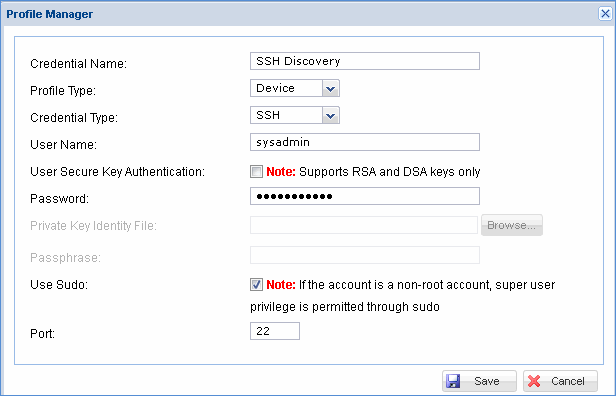
The fields are described in the following table.
|
Click 'Save' to save the configuration. The new credential profile defined is listed in the listing screen. If you need to add more SSH profiles, repeat the above process.
By default if SSH data collection type is used, the default location where the SSH script is installed is '/opt/SapphireIMS'. This can be modified by changing the 'SSH scripts install path' settings in Global Settings. SapphireIMS will automatically install the SSH script in this location.
VM data collection type is used for collecting data from virtual machines. This includes VMware, Hyper V and Xen OS and VMware cluster inventory data collection (VMware vCenter server). To use this data collection type you need to specify the VM credentials.
On clicking 'Add', the following screen is displayed. The key parameters to be specified when a new VM credential profile is defined is given below.
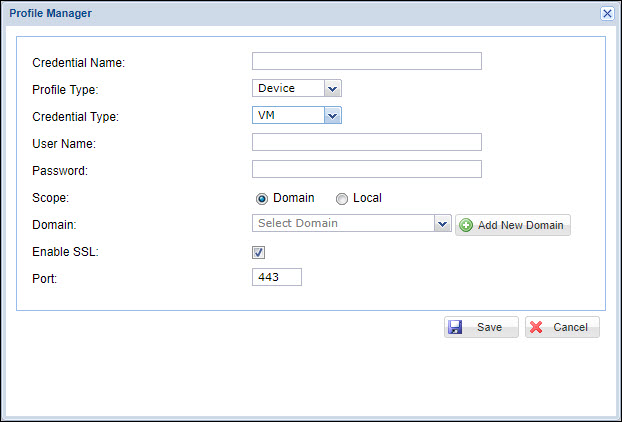
The fields are described in the following table.
|
Click 'Save' to save the configuration. The new credential profile defined is listed in the listing screen. If you need to add more profiles, repeat the above process.
LDAP data collection type is used to connect to the active directory (AD) domain controller to obtain the host names or workstations in the specified domain. Appropriate workstation profiles (WMI) also need to be selected to access the respective workstations for data collection. Following are the key parameters to be specified when a new LDAP credential is to be defined.
On clicking 'Add', the following screen is displayed. The key parameters to be specified when a new LDAP credential profile is defined is given below.
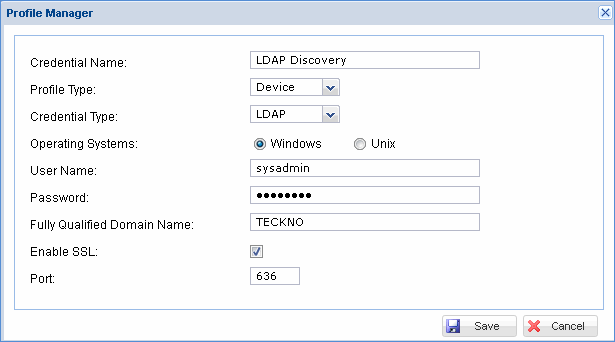
The fields are described in the following table.
|
Click 'Save' to save the configuration. The new credential profile defined is listed in the listing screen. If you need to add more LDAP profiles, repeat the above process.
FTP profile is created for accessing the FTP server to perform a backup using FTP.
On clicking 'Add', the following screen is displayed. The key parameters to be specified when a new FTP credential profile is defined is given below.
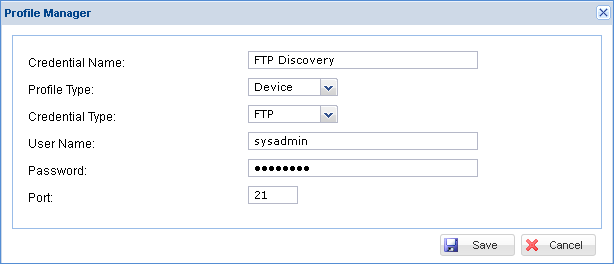
The fields are described in the following table.
|
Click 'Save' to save the configuration. The new credential profile defined is listed in the listing screen.
CLI data collection type is used to collect data from the following set of storage devices.
EMC VNX Block
VNX Series
VNX 5100
VNX 5300
VNX 5500
VNX 5700
VNX 7500
EMC Clariion
CX Series
CX 3-10
CX 3-20
CX 3-40
CX 3-80
CX4
CX4-960
CX45
CX300
CX400
CX500
CX600
CX700
CX800
FC Series
FC4700
AX 4
IBM - DS
Following are the data collection parameters to be specified when a new CLI credential is defined
On clicking 'Add', the following screen is displayed.
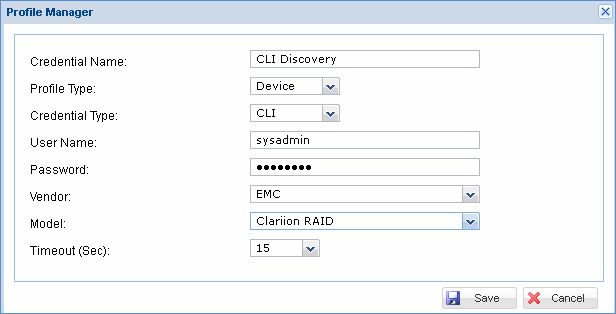
The fields are described in the following table.
|
Click 'Save' to save the configuration. The new credential profile defined is listed in the listing screen.
SapphireIMS support collection of data from thin clients. This could be collected in one of two ways:
Using WMI or SSH and directly collecting the information from the target system.
For Dell thin clients, data can be collected from the Dell Wyse Device Manager using REST API. SapphireIMS supports Dell Wyse Device Manager Version 5.7.2. The configuration is described below.
There are certain pre-requisites before enabling Dell Wyse Manager
Dell Wyse Device Manager (Version 5.7.2) must be installed and the REST API enabled.
Dedicated credentials for SapphireIMS to access Dell Wyse Device Manager needs to be available and cannot be shared by other applications.
The Key and Initialization Vector (IV) must be supplied for CBC mode AES encryption.
The thin client machines must be reachable from SapphireIMS if the option to get the device status from the clients directly using 'ping' is enabled.
Note: If the Global Setting
'Ping based on Dell Wyse Server' is set to 0 (default), then the status
of the devices is obtained directly using 'ping' else the status is obtained
from Dell Wyse Device Manager.
Following are the data collection parameters to be specified when a credential for Dell Wyse Manager is defined
On clicking 'Add', the following screen is displayed.
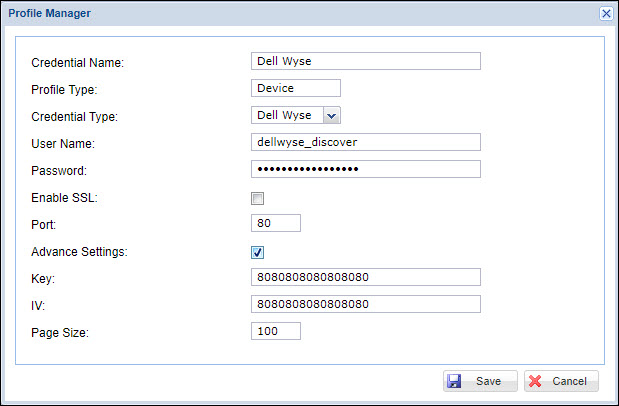
The fields are described in the following table.
|
Click 'Save' to save the configuration. The new credential profile defined is listed in the listing screen.
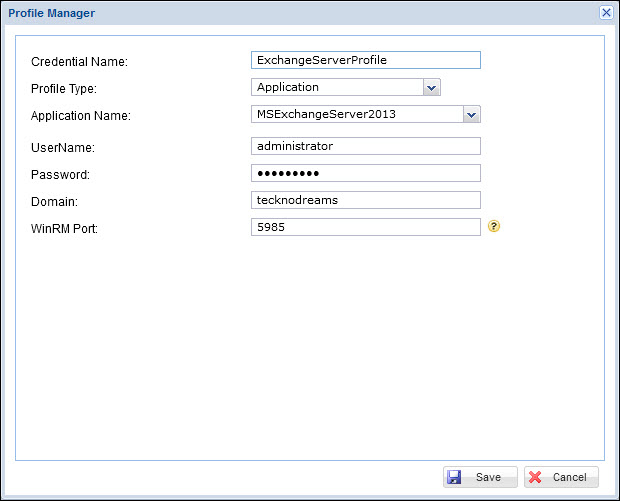
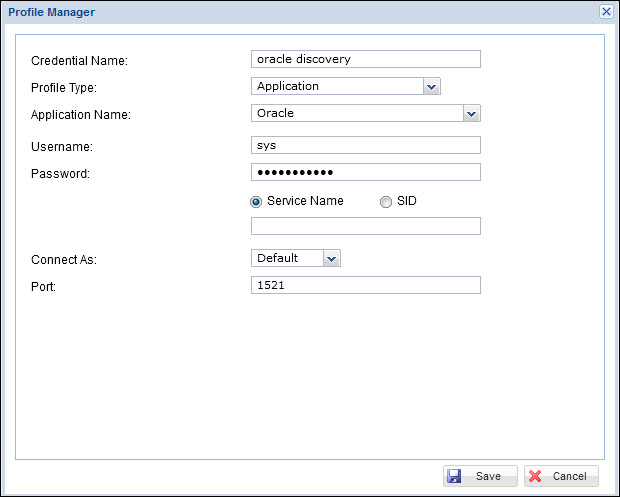
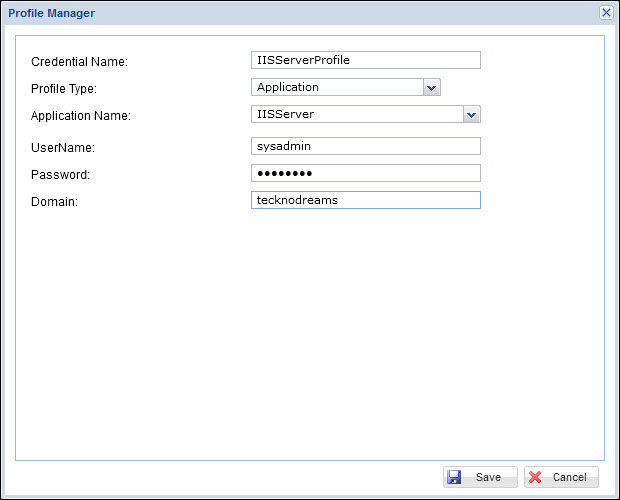
Application credential profiles are required when the discovered application has to be monitored for performance. The following categories of applications are supported for performance monitoring when the profile type is selected as 'Application'. A representative configuration in each of the application categories are given in the sections below. Note that the parameters vary with the application.
On clicking 'Add', the following screen is displayed.
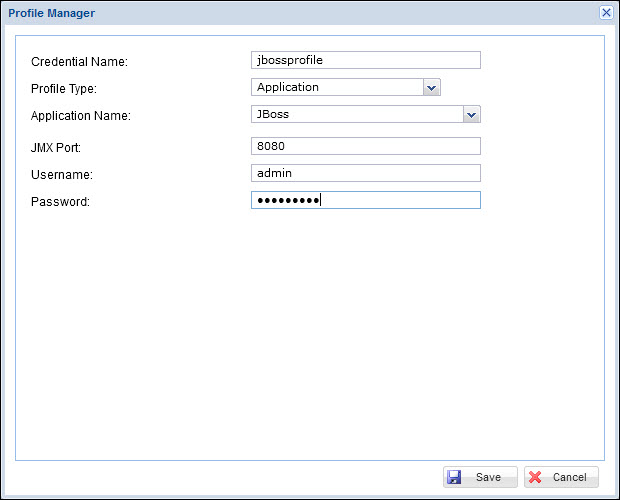
The fields are described in the following table.
|
Click 'Save' to save the configuration. The new credential profile defined is listed in the listing screen.
On clicking 'Add', the following screen is displayed.
The fields are described in the following table.
|
Click 'Save' to save the configuration. The new credential profile defined is listed in the listing screen.
On clicking 'Add', the following screen is displayed.
The fields are described in the following table.
|
Click 'Save' to save the configuration. The new credential profile defined is listed in the listing screen.
On clicking 'Add', the following screen is displayed.
The fields are described in the following table.
|
Click 'Save' to save the configuration. The new credential profile defined is listed in the listing screen.
On clicking 'Add', the following screen is displayed.
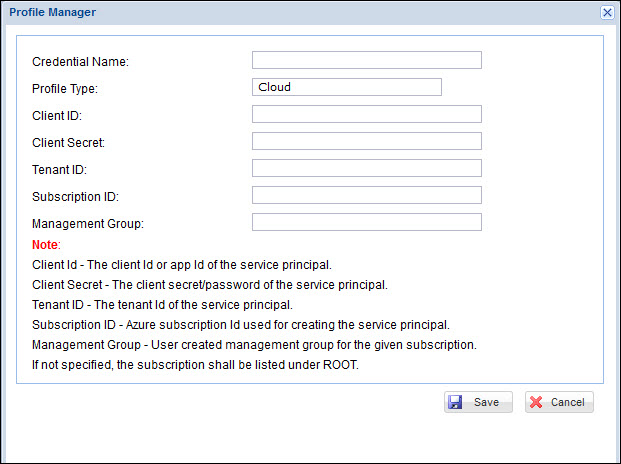
Provide a 'Credential Name'. The 'Profile Type' is 'Cloud'.
Enter the 'Client ID' which is the application ID of the service principal.
Enter the 'Client Secret' which is the client secret/password of the service principal.
Enter the 'Tenant ID' of the service principal.
Enter the 'Subscription ID' used for creating the service principal.
Enter the 'Management Group' for the subscription. If not specified, the subscription is listed under 'ROOT'.
Click on 'Save' to return to the listing screen.
This section details the steps for configuring the Profile for Cloud Native Discovery. Cloud Native Discovery involves discovery of the following types of natives resources hosted in the local network.
Container Orchestration Platforms such as Kubernetes and OpenShift
Docker Containers
The configuration of the profiles is described in the following sections.
Click 'Add' in the Profile Manager listing screen. The following screen is displayed.
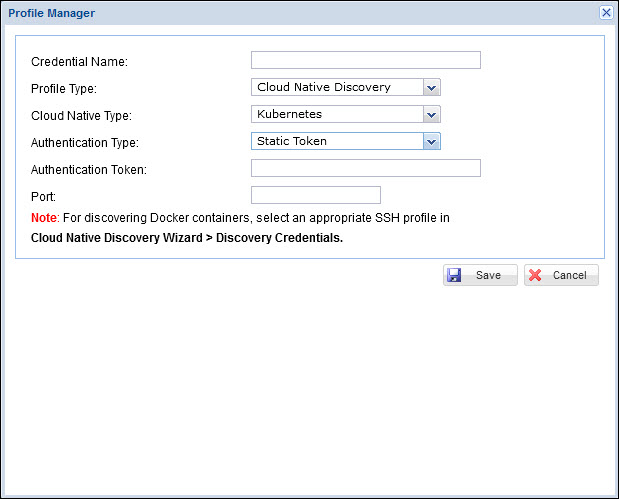
The fields are described below.
|
Click on 'Save' to save the profile.
Click 'Add' in the Profile Manager listing screen. The following screen is displayed.
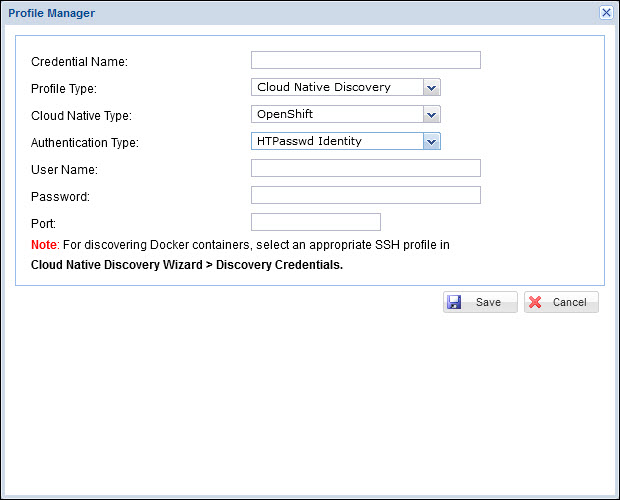
The fields are described below.
|
Click on 'Save' to save the profile.
To discover Docker Containers, there is no separate profile which needs to be created in the Profile Manager. The Docker Containers are discovered by establishing an SSH session with the target host. Create and select an appropriate SSH based discovery profile configuration.