![]()
![]()
Using SapphireIMS you can enforce and track compliance to Standard Operating Procedures. Every function in an organization would have certain procedures defined as part of the business process. SapphireIMS can facilitate monitoring of compliance to the operating procedures. Schedule Tasks can be created and then scheduled to follow the SOP. The tasks can be scheduled based on a location or globally.
While the SOP is similar in functioning to the Schedule Tasks, it additionally provides a dashboard view of the ticket status.
Click on 'SOP Compliance' in the Scheduled Task listing screen. The SOP dashboard will be displayed

The list of schedule records along with the status is shown for each of the locations including the 'Default' location. In addition if the record is scheduled at all locations the status is also shown under 'Global'. Each entry has the status of the scheduled record shown by the color indicator and the status of the last ticket submitted by that scheduled record for that location shown by the color of the lining of the cell.
The table below details what the color of the indicators and the lining means.
|
 Note: For the schedule record
status to appear on the SOP dashboard, the record must be scheduled on
this dashboard itself and not from the Saved Records tab.
Note: For the schedule record
status to appear on the SOP dashboard, the record must be scheduled on
this dashboard itself and not from the Saved Records tab.
Follow the steps below to schedule a new task.
Click on the  button which appears when you hover the mouse on the indicator
for that location.
button which appears when you hover the mouse on the indicator
for that location.
The scheduler screen is displayed
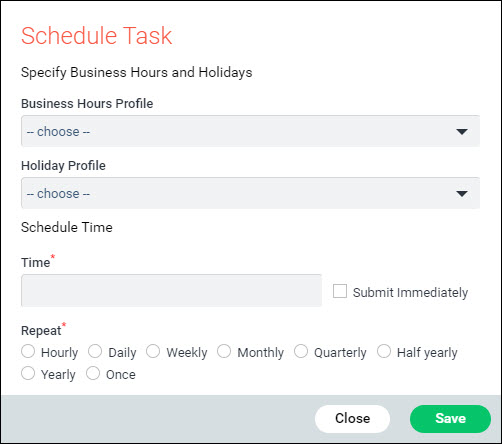
Select the 'Business Hours Profile'. The tasks will not be submitted outside of the business hours defined in the profile. To create a profile refer to Settings->Service Desk Configuration->Business Hours Profile.
Select the 'Holiday Profile'. The tasks will not be submitted during the holidays defined in the profile. To create a holiday profile refer to Settings->Service Desk Configuration->Business Hours Profile.
If you want to schedule the task at a specific time select the date and time in the 'Time' field using the calendar.
If you want to schedule the task immediately, click on the checkbox 'Submit Immediately'.
If you want the ticket to be periodically submitted, enter the 'Repeat' interval.
Click on 'Save' to create the task.
To edit
or delete an existing schedule task, click on the indicator for that
location or under global. The  button is displayed.
If you want to edit the scheduling details, click on 'Edit' and the current scheduling details are displayed. Make any changes and click 'Update'.
If you want to delete the schedule record, click on 'Delete', A confirmatory message appears and on clicking 'Yes', the record is deleted.
To view
the tickets submitted by an existing schedule task, click on the indicator
for that location or under global. The button
is displayed.
Click on 'View'. The ticket listing view is displayed with all the tickets submitted by that scheduled task.