![]()
![]()
States are the basic elements for defining a workflow. The workflow itself mirrors the business process. A workflow is made up of a number of states and the record progresses in the workflow through the state transitions which occur. States belong to a State Category.
There are pre-defined states for the in-built project types. You can add or modify the state definitions.
Click on 'Work Flow Management' option on the right hand side panel.
Click on 'States'. The list of States is displayed.

To add a new state enter the 'State Name' and the 'Short State Name'. Select a 'Color' using the color picker. The color is used while displaying the bar on the left side against the record.
Select the 'State Category' to which the State belongs.
Each state has some parameters which can be configured. While there are a few parameters which are common across all states, there are other parameters which are specific and present only if the state has been inherited from one of the states which are 'Assign', 'Waiting for Approval' and 'Multi-Level Approval'. These parameters include fields which appear when a transition is done to that state. For example, when moving the state to 'Assign', the 'Department' and 'Location' fields can be displayed and which helps in filtering the user to whom the record has to be assigned. Other parameters control what functionality is possible or what is not in the new state. For example, 'Allow Escalation to Management' could be enabled or disabled in the state to which the transition is happening.
Select the 'Inherited From' if the state has to inherit the parameters of the state in the list. If not, do not select. By default all states have certain default parameters which are described in a later section.
The parameter values can be edited only after the state is added.
After the state appears in the listing, click on  to
customize the parameter values. Refer to Service Desk->Settings->Work Flow
Management->States->Customizing Fields for details
of the parameters.
to
customize the parameter values. Refer to Service Desk->Settings->Work Flow
Management->States->Customizing Fields for details
of the parameters.
You can select a state to be a Start state indicating that the state is the first state in the workflow. Select the state and click on 'Start State'.
You can select a state to be an End state indicating that the state is the last state in the workflow. Select the state and click on 'End State'.
Click on 'Add'. The added state appears under 'States to be added'. The state will be added upon saving the changes.
If you want to delete any state, click on  icon against the state. The state is moved under 'Pending
states to delete'. The state will be deleted upon saving the
changes.
icon against the state. The state is moved under 'Pending
states to delete'. The state will be deleted upon saving the
changes.
 Note: If the states have
the name as Assign, Waiting for Approval and Multi-Level Approval, then
they automatically inherit the attributes of these states and 'Inherited
From' need not be explicitly specified.
Note: If the states have
the name as Assign, Waiting for Approval and Multi-Level Approval, then
they automatically inherit the attributes of these states and 'Inherited
From' need not be explicitly specified.
The custom fields vary depending on which state the new state is inherited. The custom fields for each of the states which can be inherited are described in the sections below.
To customize the parameter values for a state click on icon against the state. The parameter values are displayed.
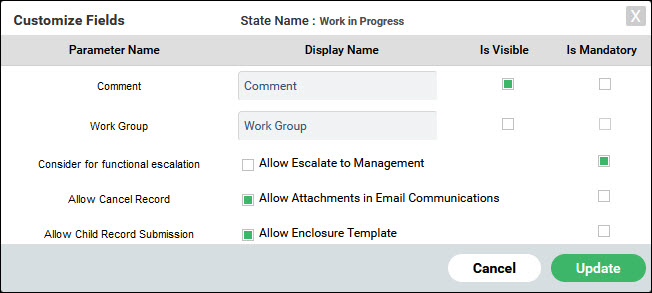
The parameters are described in the table below. Fields will appear during the state transition, if they are enabled by setting the 'Is Visible' option. Fields can be made mandatory during state transition by setting the 'Is Mandatory' option.
|
After completing the settings, click on 'Update'.
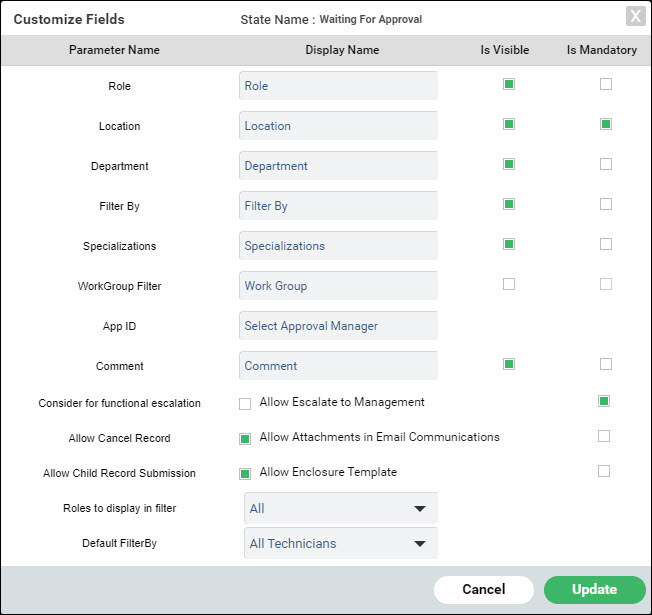
To customize the parameter values for a state click on icon against the state. The parameter values are displayed.

The parameters are described in the table below. The fields will appear during the state transition, if they are enabled by setting the 'Is Visible' option. Fields can be made mandatory to enter during state transition by setting the 'Is Mandatory' option.
|
After completing the settings, click on 'Update'.
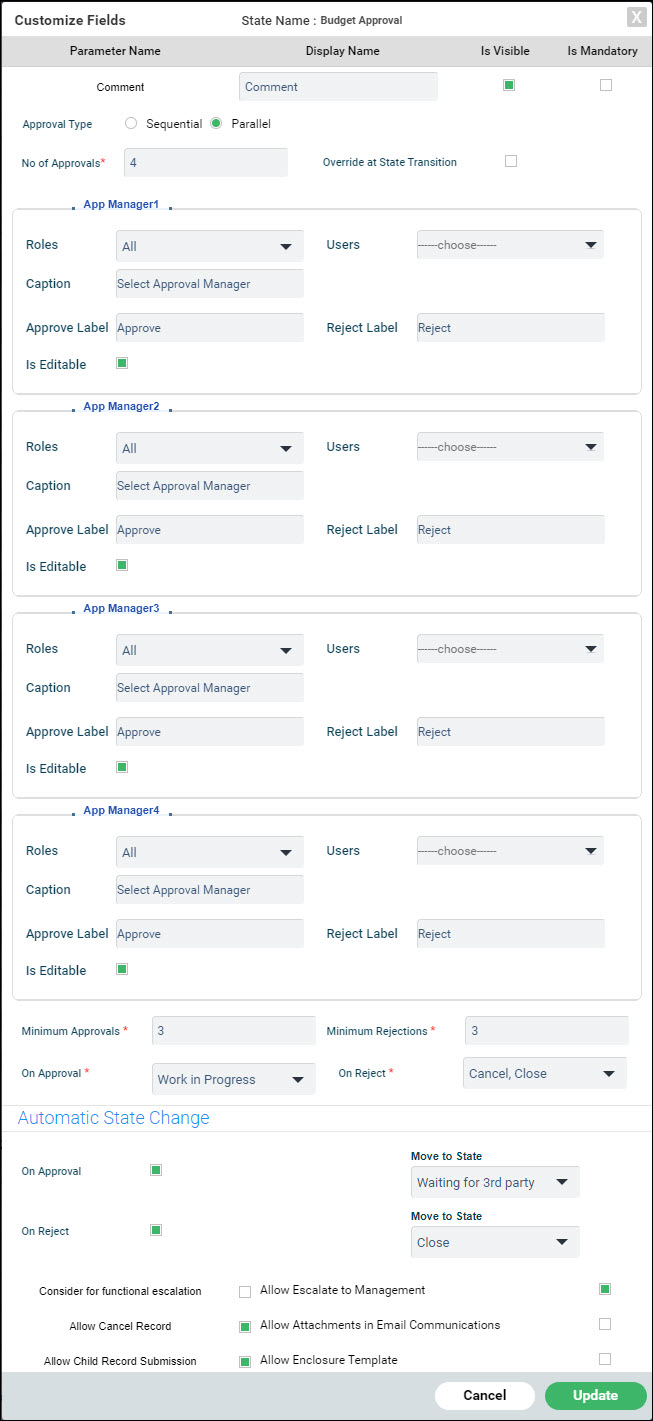
To customize the parameter values for a state click on icon against the state. The parameter values are displayed.
The parameters are described in the table below. The fields will appear during the state transition, if they are enabled by setting the 'Is Visible' option. Fields can be made mandatory to enter during state transition by setting the 'Is Mandatory' option.
|
After completing the settings, click on 'Update'.
The logic for the Minimum Approvals and Rejections works as follows especially in the scenario when both are configured with the same number.
Once an approval or rejection happens, then the following algorithm is applied:
If the Rejections done are greater than or equal to the Minimum Rejections, then the record is rejected.
If the Approval done are greater than or equal to the Minimum Approvals, then the record is approved.
If the Total Approvals less the Approvals done added with the Approvals Pending is less than the Minimum Approvals, the record is rejected.