![]()
![]()
This topic describes the configuration of Status and Lifecycle fields. Assets have a status associated with them which indicate where the Asset is in its lifecycle. The Lifecycle of an Asset begins with its acquisition when it comes to being in stock. The Asset is then deployed where it is Allocated and De-allocated across users of the asset. Finally at the end of its life, the asset is scrapped.
As the asset status is changed, there can be additional Lifecycle fields associated with the asset which can be updated. For example, fields for service request ID and username can be introduced which are updated when the asset is moved to Allocated state.
There are some status fields and Lifecycle fields which are pre-defined. These can be modified or new ones added. This topic describes the steps to edit or add these fields.
 Note: Status and Life Cycle
fields are applicable for Asset modules only.
Note: Status and Life Cycle
fields are applicable for Asset modules only.
Click the 'Settings' tab. Click on 'Assets'. Click on ‘Asset Status’ in the left hand panel.
The pre-defined status fields are displayed. You can configure the status field for each module separately. Select the module in the pull down menu on the right.

Click 'ADD' to add a new asset status
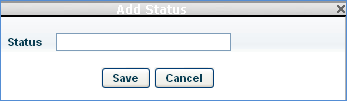
Enter the Asset 'Status ' and click 'Save'.
To delete a Status, select that in the list and click 'DELETE'.
The pre-defined Asset Life Cycle fields can be modified or new ones added. There are some in-built fields which can be selected or a new custom field added. Access to these fields can be restricted based on permissions.
Click the 'Settings' tab. Click on 'Assets'. Click on ‘Life Cycle’ in the left hand panel. The list of Life Cycle fields is displayed. You can configure the status field for each module separately. Select the module in the pull down menu on the right.

To edit an existing Life Cycle field click on it or click on 'ADD' to add a new field.

The fields are described below.
|
Click 'Save'.
To delete a Life Cycle field, in the listing screen, select the Life Cycle field and click on 'DELETE'.