![]()
![]()
Mail server has to be configured in the service desk module so that when an e-mail is sent to the specified e-mail ID, automatically a service desk record is generated. This is to facilitate service desk users as well as those users who are not a part of SapphireIMS to submit a record.
To configure the mail server, click the ‘Settings’ tab. In the ‘Service Desk Configuration’ section, click ‘Email to Record Configuration’. The list of configured rules for e-mail to record submission are displayed.

Select the configured rules and click 'DELETE' to delete the rules.
Select the configured rules and click 'DEACTIVATE' to deactivate the rules.
Select the configured rules and click 'ACTIVATE' to activate the deactivated rules.
Select the configured rules and click 'FETCH NOW' to fetch the e-mails immediately and convert them to records
Click 'ADD' to add a new e-mail to record configuration rule. Refer to Adding E-mail To Record Rule for details.
There are some global settings which need to be configured.
Click on the '+' against 'Advanced Settings'.
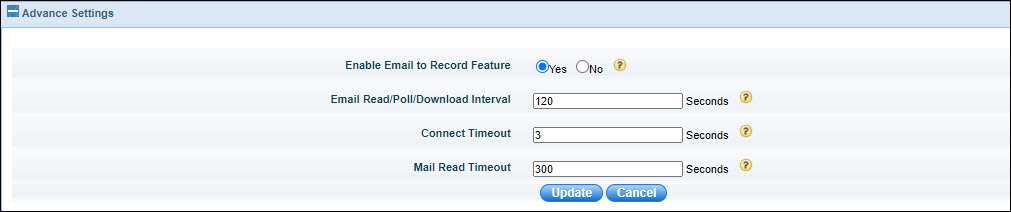
Select the option to enable or disable the feature.
Set the 'Email Read/Poll/Download Interval' value which is the interval at which SapphireIMS scans the mailbox for new E-mails. The default is 120 seconds.
Set the 'Connect Timeout' value until which the connection to the mailbox is retried. The default is 3 seconds.
Set the 'Mail Read Timeout' value until which SapphireIMS attempts to retrieve an E-mail. The default is 300 seconds. Note that this value should be more than the 'Connect Timeout' value.
Click on 'Update' to save the configuration.
Click on 'ADD' to create a new configuration. The following screen is displayed.

|
For IMAP mail server option, SPAM folders (and other folders of user choice) are iterated along with Inbox folder under Email to Record Configuration.

Click on “Scan Mailbox” to scan the mailbox of the configured email id and get the list of folders available in the mailbox (Proper Server Name, Use SSL, Port Number, Polling Email Id, User Name and Password should be provided)
Select the Email Folders to include for Email to Record Conversion (by default “Inbox” folder is selected and included for Email to Record Conversion)
To activate or deactivate an Email to record configuration, select the configuration name in the listing page and click the corresponding button

 Note: The Basic Exchange
Authentication has been deprecated by Microsoft and is no longer
supported. Please use Modern Authentication options which is either
'Modern Exchange' or 'Modern IMAP'.
Note: The Basic Exchange
Authentication has been deprecated by Microsoft and is no longer
supported. Please use Modern Authentication options which is either
'Modern Exchange' or 'Modern IMAP'.