![]()
![]()
 Note: The Calendar icon is
visible only if the calendar is enabled for your role.
Note: The Calendar icon is
visible only if the calendar is enabled for your role.
The Service Desk has a calendar which enables you to view 'Reminders', 'SLA', 'User Surveys' and 'Custom Events'. These are highlighted in different colors in the calendar view and on clicking will display the corresponding ticket.
To view the calendar, click on the  icon
on the left hand panel. The calendar is displayed. The calendar view
can show details from all the projects.
icon
on the left hand panel. The calendar is displayed. The calendar view
can show details from all the projects.
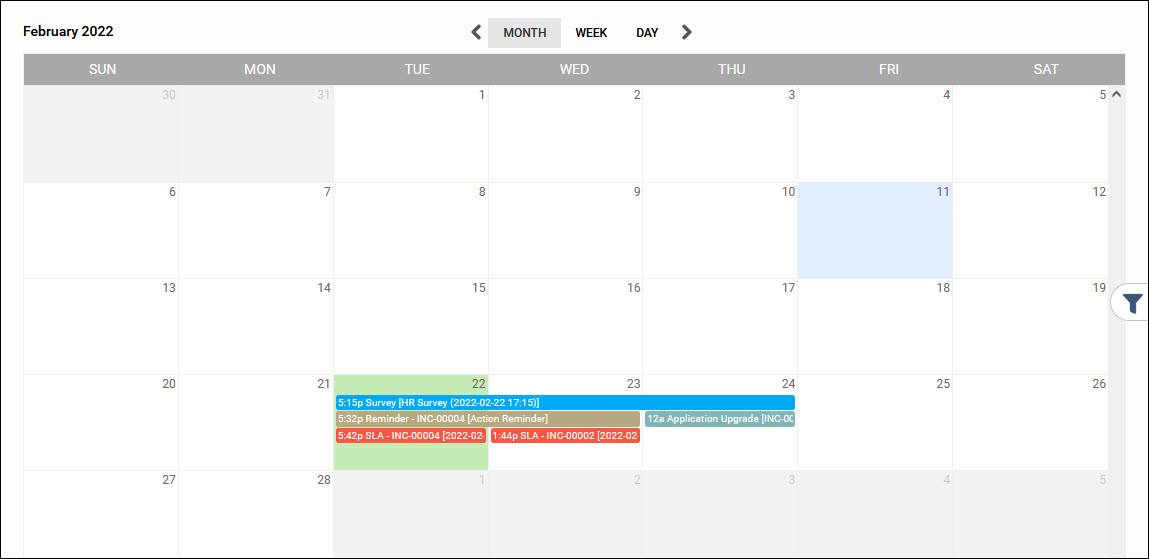
The details of the various highlights on the calendar is described below. The cell corresponding to today's date is highlighted.
|
You
can filter the information based on Project, Location, Department
and CI. The CI filter is applicable only for Events. Additionally
you can filter on the type of calendar entity like SLA, Reminders,
Survey and Events. To apply a filter on the calendar, click on ![]() icon.
icon.
The filter screen is displayed.

Select the 'Process', 'Location', 'Department' and 'CI'. Click on one or more of the Calendar entities to hide or make visible on the calendar.
Click on 'Apply'.
Note: This section is intended
for SapphireIMS administrators or Project Managers who have the privileges
required for configuration.
You can set calendar event in one of two ways, either by editing the information in the ticket or directly editing in the calendar. Prior to this you must configure the Calendar Event in the ticket. The steps for this configuration are given below.
Create a new form field of type 'Calendar Event'. Refer to the topic Settings->Service Desk Configuration->Form Fields for the steps for this.
Add the new form field created into the project as an additional field. Refer to the topic Service Desk->Settings-> Fields & Forms->Additional Fields for the steps for this.
If the Service Desk project has an additional field of 'Calendar Event' type configured, the additional field will appear in the form as shown below.

Click on 'Add' to add a new calendar event. The 'Start Date', 'End Date', 'Title' and 'Description' of the event needs to be entered.
Click on the ![]() icon to add the event.
icon to add the event.
Click on 'Update' or 'Save' to save the ticket.
The event is displayed on the calendar between the start and end dates.
You can also directly edit the calendar to add or update calendar events. Follow the steps below.
Click on the date where you want to create the event. A calendar event entry screen pops-up.
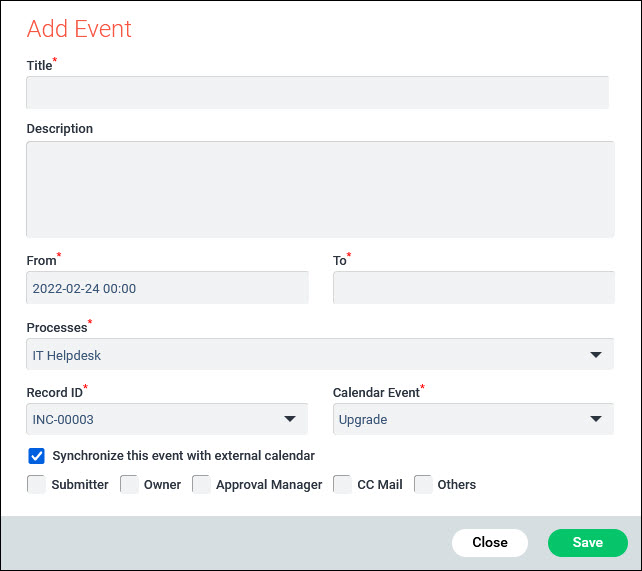
Enter the 'Title', 'Description', 'From' (if it is different from the date displayed) and 'To' fields.
Select the 'Process' to add the event.
Select the 'Record ID' which is the Service Desk Ticket. Select the 'Calendar Event'.
Click on 'Synchronize this event with external calendar' to add or update the event with external calendars of the 'Submitter', 'Owner', 'Approval Manager', 'CC Mail' or even to an external e-mail id by clicking on 'Others'. If you click on 'Others', a the 'External Email Address' box appears and you need to enter the e-mail address.
Click on 'Save'.
You can also edit any calendar event visible on the calendar by double clicking on it.
If a conflict is detected with an existing event, because the CI is the same and the event start and end times overlap, an error is displayed with the conflict details.


