![]()
![]()
Asset Management section allows users to capture the data for the asset types that are defined. In addition it provides interfaces to manage the asset life cycle operations. This acts as a single point entry to get to know about the assets and the utilization level of the assets.
 Note:
The role ‘Asset Admin’ will have the rights to configure assets (Add/Edit/Delete).
The role ‘Asset Operator’ will have rights to change the asset status
and the ‘Asset User’ will have access to view the asset details. Depending
on your role you may be restricted from carrying out asset operations.
Note:
The role ‘Asset Admin’ will have the rights to configure assets (Add/Edit/Delete).
The role ‘Asset Operator’ will have rights to change the asset status
and the ‘Asset User’ will have access to view the asset details. Depending
on your role you may be restricted from carrying out asset operations.
The Asset Management listing page provides details of the configured assets. The following actions can be performed from this page. Click on 'Asset Management' tab. Note that the tab name is based on the asset module name.
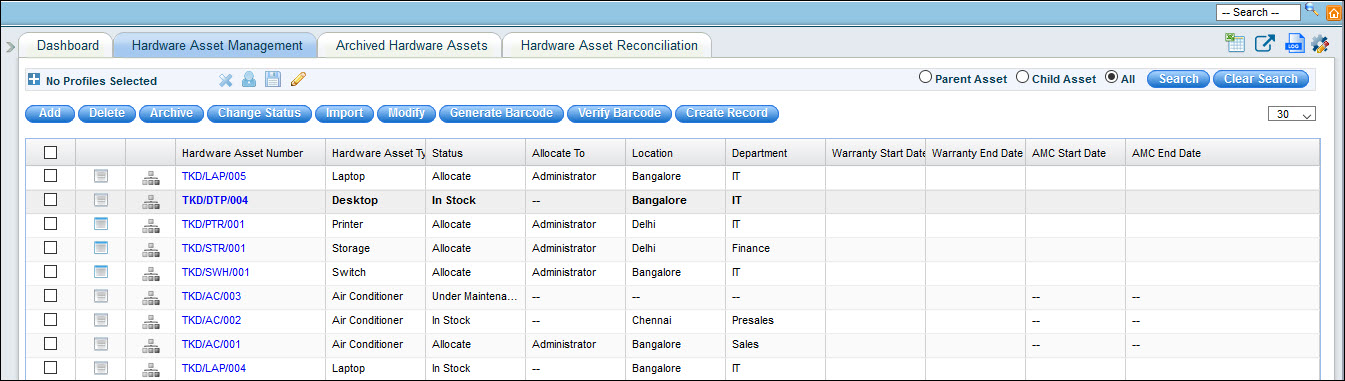
Select 'Parent Assets' and 'Child Assets' to filter for parent or child assets or select 'All' to display all assets.
Click on the  button
against the asset record to view any associated service desk records.
If there are no records associated this button is greyed. To
associate assets to service desk records, refer Selecting
the Asset.
button
against the asset record to view any associated service desk records.
If there are no records associated this button is greyed. To
associate assets to service desk records, refer Selecting
the Asset.
Click on  to view
the relationship with other assets.
to view
the relationship with other assets.
Click on '![]() ' to customize the asset management
listing view. Any custom fields added under the 'Field Definitions'
section of CI Types and Attributes is listed here as shown below.
For more information on adding custom fields, Refer CI
Types and Attributes.
' to customize the asset management
listing view. Any custom fields added under the 'Field Definitions'
section of CI Types and Attributes is listed here as shown below.
For more information on adding custom fields, Refer CI
Types and Attributes.
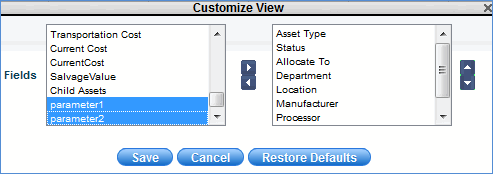
In the screen above, parameter1 and parameter 2 are custom fields added for a particular asset or CI type.
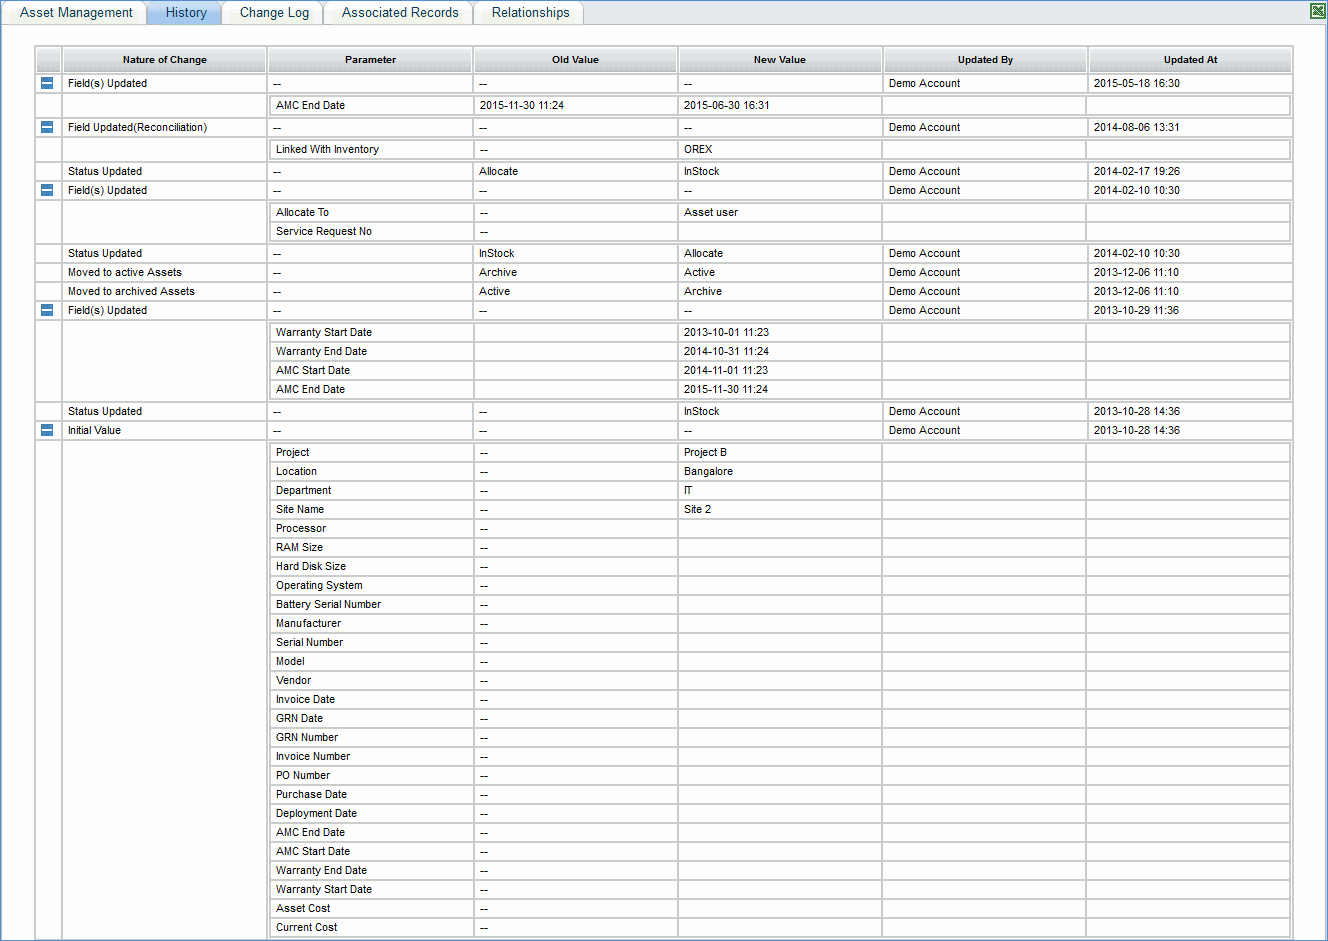
To view the history of changes to assets, click on![]() . The history is displayed.
. The history is displayed.
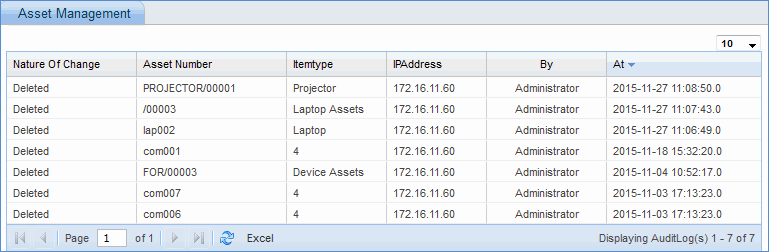
The history can be exported into an Excel.
Note: In the Asset listing
views, you can select any content by clicking and dragging on the cell
contents and then press CTRL+C to copy to the clipboard.
The asset listing page will list all the assets by default. You can refine your search by defining search profiles.
If a search
profile is selected, click on  button to clear
the existing profile view configuration. 'No Profiles selected' is
displayed in the asset listing page.
button to clear
the existing profile view configuration. 'No Profiles selected' is
displayed in the asset listing page.
Click the '+' button to view the filters for setting the search criteria.

Select the filters
applicable for the search profile and click on ![]() to display the 'Add Search Profile' screen as shown below.
to display the 'Add Search Profile' screen as shown below.
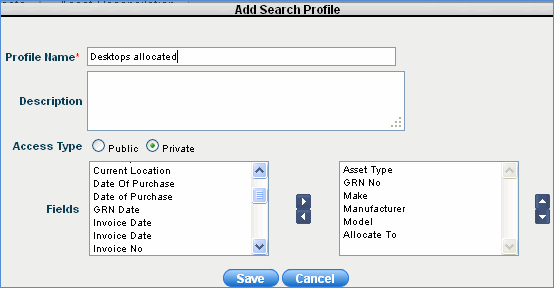
Type the 'Profile Name' and 'Description'.
Select the fields to be displayed for the search profile.
Select 'Public' if the search profile needs to be made available to all users. Select 'Private' if the search profile needs to be restricted to only the logged in user.
Click 'Save'. Once saved, the public profile is displayed under 'Views' and the private profile is displayed under 'My Views' profile listing as shown below.
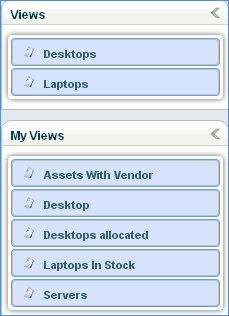
Click ![]() to make the search profile as the
default.
to make the search profile as the
default.
You can add new assets either via the user interface or using the bulk import feature to import the assets from an excel sheet.
To add a new asset click ‘Add’. The asset addition screen is displayed. Select the 'Asset Type' from the list and the screen will further expand. The asset fields can vary depending upon how the asset has been modeled and the attributes which are defined.
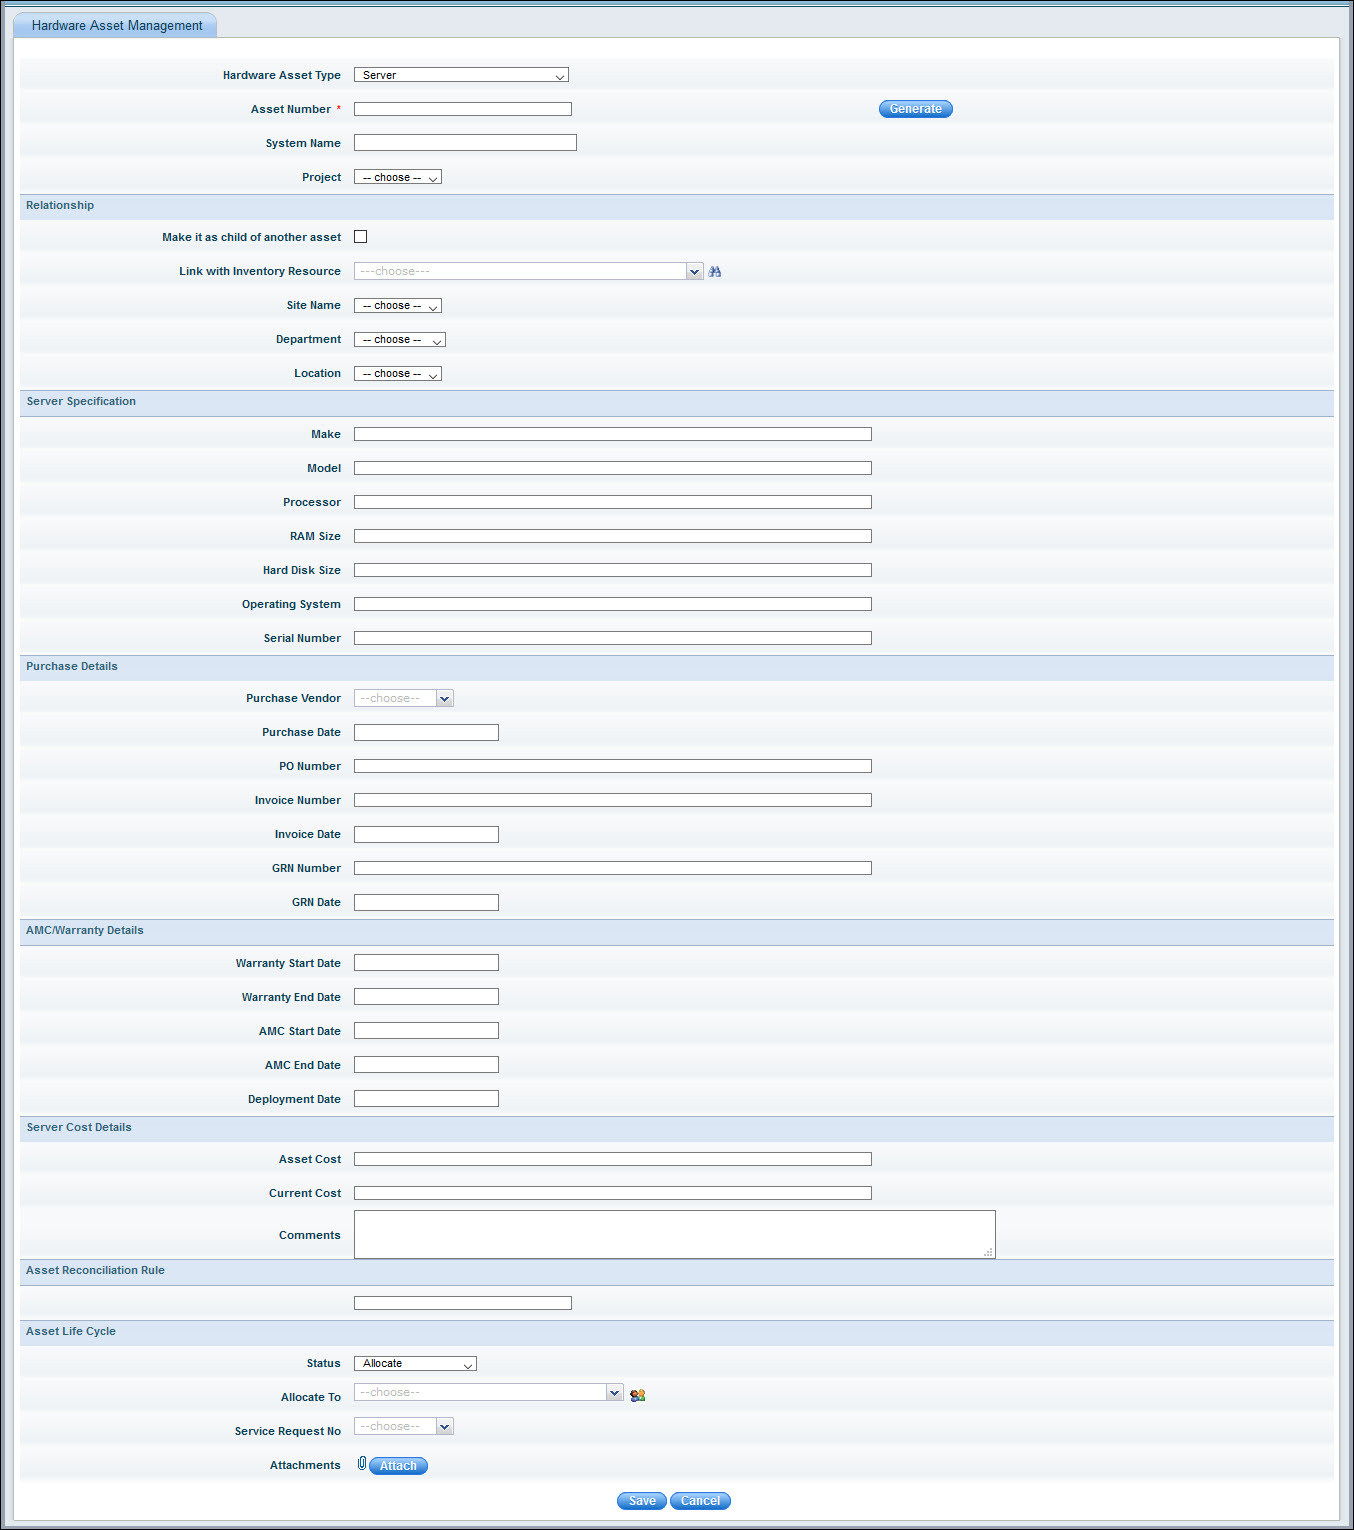
Refer to the table below for the description of the asset fields.
|
Click on 'Save' to save the asset record.
Notes:
1. Projects can be defined by using the option 'Settings – Asset and Inventory Management – Misc. Config'
2. Select 'Asset Type' as Laptop to provide additional fixed fields information for the asset
3. Alerts for asset warranty/AMC expiry are sent one month before the expiry date as an asset summary report mail attachment
4. You can enable or disable asset number generation as per your requirement. Change the global settings key 'Option for disabling asset number' to the option that suits your requirement. If asset number is disabled, it will not be visible in asset management screen. Similarly if CI number is disabled, it will not be visible in CI Management screen. The assets or CI items listed under 'Tree View' will display the corresponding asset ID's or CI ID's in case asset or CI numbers are not available.
To delete an Asset, select the Asset and click on 'Delete'. A confirmation message is displayed and click 'OK' to proceed for deletion.
Asset records can be archived if they are no longer active (for example once the asset is scrapped). Archived assets can be viewed under the 'Archived Assets' tab.
To archive an Asset, select the Asset and click on 'Archive'. A confirmation message is displayed and click 'OK' to proceed for archival.
The status of an asset can be changed as the asset proceeds through its life cycle.
To change status, select the Asset and click on 'Change Status'. A pop-up to enter the new state is displayed.

Select the new status and click on 'Modify'.
Instead of entering the entire details of the asset while creating manually especially when there is a large quantity of similar assets, a template can be created where much of the common information can be pre-filled. Once the asset is created, it can be updated to modify fields specific to the asset. Refer Settings->Asset and Inventory Management->Assets->Import Templates for details on Asset Import Templates.
Click on 'Import'. The asset import screen is displayed.
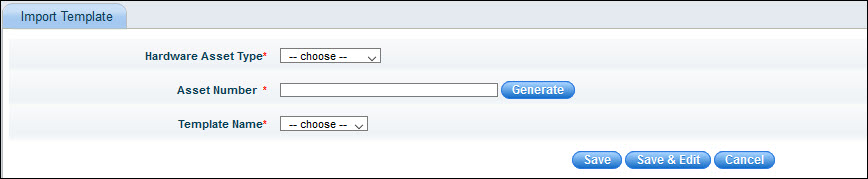
Select the 'Asset Type'. Click on 'Generate' to generate the asset number or key in the Asset Number.
Select the 'Template Name' to select the template to use.
Click on 'Save' to create a new asset or 'Save and Edit' which displays the asset for editing details before saving.
If one or more attributes has to be changed for multiple assets, then a modify asset template can be created and used. Refer Settings->Asset and Inventory Management->Assets->Import Templates for details on Asset Import Templates.
Select one or more assets and click on 'Modify'.

The assets are listed. Select the 'Template Name' to be used.
The attributes which have to be updated are displayed. Update the fields with the new values.
Click on 'Save'.
Assets details can be edited by clicking on the asset in the asset listing view. The asset fields are displayed.

You can make changes and click 'Update' to save the changes.
Click on the Excel icon or PDF icon to save the record details in the respective format.
Changes made to asset details are recorded in the asset history. Click on the ‘History’ tab to view the history as shown below.
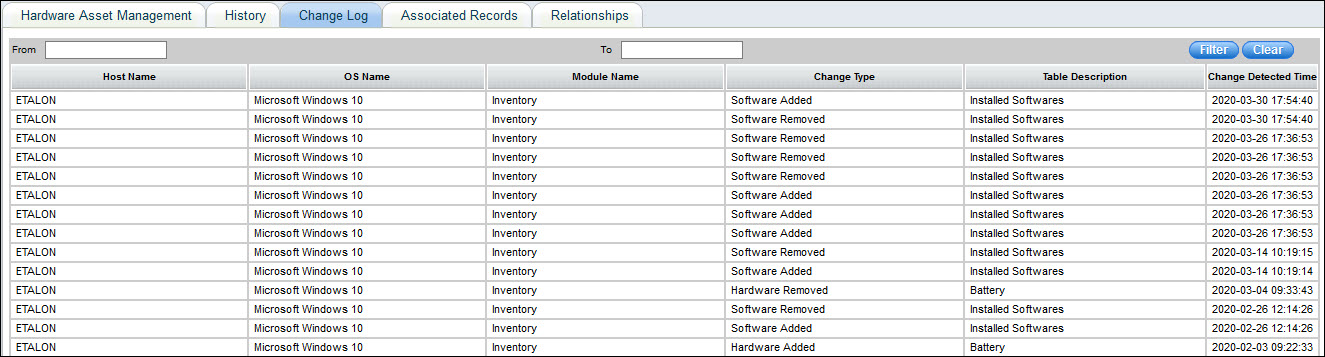
For assets which are linked to inventory, you can view the inventory changes which have happened on the asset.
Click on 'Change Log'. The change log screen is displayed.
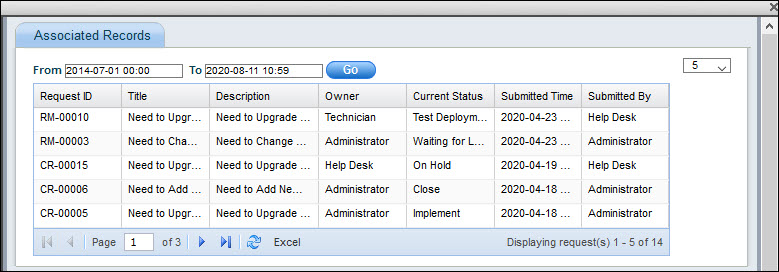
Click on 'Associated Records' to view the Service Desk records associated with the asset.

Select the time period for which you want to see the associated records.
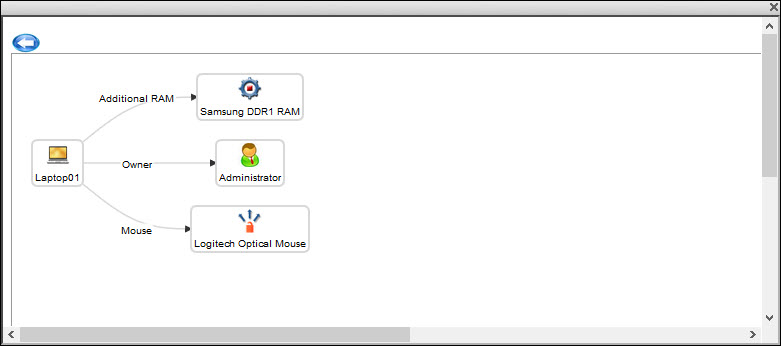
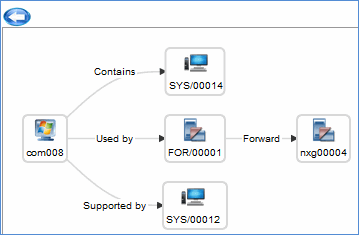
This option is used to configure the relationship between assets. An asset can be related/mapped to one more assets, contracts or CI. For example. a printer can be related/mapped to a desktop. Configuring the relationship helps in knowing the dependencies between the assets so that any impact can be known. For example, if a server is shut down then the dependent assets which could be applications could be viewed. In-turn if there are users defined as dependents for the application, they could be informed. Such relationships could be visualized in a tree view.
Click on 'Relationships' tab.
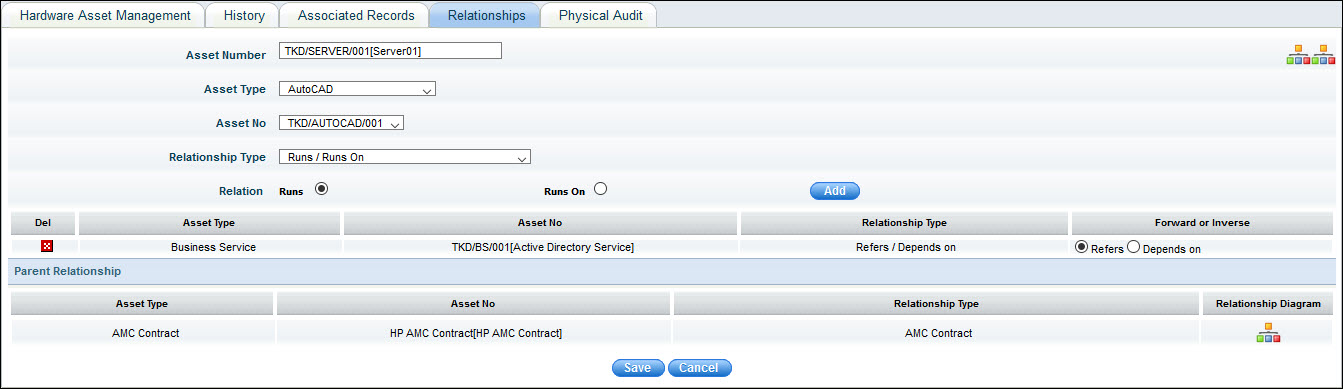
The fields are described below.
|
Click on 'Save' to save the relationship definition.
Click on CMDB Child Relationship
diagram icon '![]() ' to view the relationship between
the assets.
' to view the relationship between
the assets.
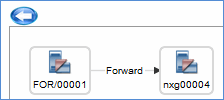
Click on CMDB Parent-Child Relationship
diagram icon '![]() ' to view the relationship between
the assets.
' to view the relationship between
the assets.
SapphireIMS provides a facility to generate bar codes for assets. The bar code can be printed and physically placed on the asset. SapphireIMS supports a physical verification audit to be conducted on the asset using bar code scanner devices or the mobile application. For configuring the bar code refer to Settings->Assets and Inventory Management->Assets->Bar Code Configuration.
Select one or more assets in the asset listing view and click on 'Generate Bar Code' to generate a PDF document containing the bar code. You can save the document for later printing.
To search for assets based on bar code or to verify a bar code number, click 'Verify Barcode'. Use a bar code scanner to scan the asset number or enter the bar code number (same as asset number) and click 'Verify'. The verification status shows as green if the asset is verified.

To export bar codes to an excel report, click on the Excel icon in 'Barcode verification' page
Select the asset number and click 'Change Status' to change the status of the asset.
Using the bar code or QR code which can be generated, printed on stickers and fixed to the assets, physical verification of the assets can be carried out for the purpose of financial audits etc. You need to download the SapphireIMS Physical Asset Verification (PAV) app which is supported on Android phones. Refer the topic SapphireIMS Mobile App->SapphireIMS PAV App for details on using the mobile app for asset verification.
Click on 'Physical Audit' tab. The audit details for the asset are displayed.

The 'User Name' is the name of the IT engineer performing the audit. The 'Scan Time', 'Latitude' and 'Longitude' of the asset is captured based on GPS coordinates. The 'Status' and 'Comment' is the status and comment updated by the IT Engineer. The 'Address' is the location of the asset obtained based on the GPS coordinates.
Click
on  and a pop-up appears with the location of the
asset on a map.
and a pop-up appears with the location of the
asset on a map.
Note: The Global Settings
key 'Enable Service Desk Ticket Submission for Asset' must be set to 1
to enable this feature.
SapphireIMS provides a facility to create a Service Desk record for an asset and link it.
Click on 'Create Record' tab. The project selection screen is displayed

Select a 'Project' from the list and click on 'New Record'.
The Service Desk Record submission screen is displayed. Enter the fields and click on 'Save'. A record is created with the asset number linked to it.
 to
open the search window.
to
open the search window. 