![]()
![]()
The problem records are organized into three different tabs namely My Problems, My Work Group and All Problems.
1. My Problems – This tab will list all problems submitted or owned by the logged in user. This tab is only visible for users with 'Problem User' role.
2. My Work Group - This tab will list all problems submitted in the Problem Management project which are mapped to a particular work group.
3. All Problems – This tab will list all problems submitted in the Problem Management project. Only users with Technician role will have permission to view this tab.
The fields displayed can be customized by clicking Customize View option in Actions menu.
Notes:
1. Only users with technician role will have access to Customize View option
2. SLA violated problems are displayed in red color

Problem Listing
Click on the 'Quick View' icon to open the service desk record and view/edit the details
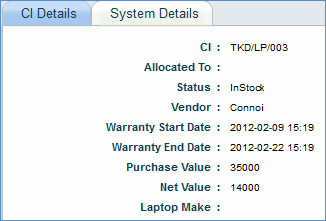
Click on the 'CI details' icon to view the details of the associated assets as shown below
Proxy Submitter: If the incident is submitted on behalf of somebody, 'Proxy Submitter' will list the name of the logged in user, and 'Submitted By' will list the actual user.
Click
![]() icon to change the state of the service desk record.
icon to change the state of the service desk record.
1.
Click 'Attachments' tab or click the '![]() ' Attachments
icon in the incident listing page
' Attachments
icon in the incident listing page
2. Check the attachments and click 'Compressed Download' to download multiple attachments.
You can bookmark tickets in 'My Problems' listing page. Bookmarks are specific to a project and help you to prioritize tickets in 'My Problems' listing page. Bookmarks feature is available to all users who have submitted tickets or who are owners of tickets.
For more information on bookmarks, please refer to the section on Bookmarks in Incident Listing and Details
1. Customize View: Click
![]() option
to customize the problem request listing screen.
option
to customize the problem request listing screen.
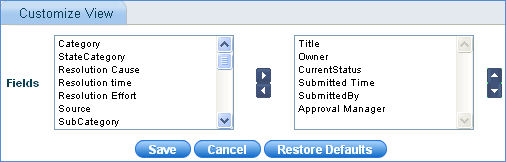
Select the fields to appear in the problem listing page as well as the order of the fields by using the arrow keys.
Click Save to save the custom view
Click 'Restore Defaults' to restore the default custom view
2. Create Change: Refer "Open Change Request from Problem"
3. Link to Change: Refer "Link Problem to Change"
4. Link Problem: Refer "Link Problems within the project"
5. Bulk State Transition: Refer "Bulk State Transition"
6. Mark as Unread: Check the problem record to be highlighted as Unread, click the 'Actions' drop down list box and click 'Mark as Unread' option. This option will highlight the record in Bold.
7. Mark as Read: Check the problem record, click the 'Actions' drop down list box and click 'Mark as Read' option. This represents that the record is read.