![]()
![]()
This topic describes the various Asset Operations which can be performed.
 Note: The system prevents
concurrent updates to an asset. If another user has updated the asset
after the data was retrieved, an alert will be displayed on trying to
save the changes. The asset screen will be refreshed with the changes
and the modification has to be repeated.
Note: The system prevents
concurrent updates to an asset. If another user has updated the asset
after the data was retrieved, an alert will be displayed on trying to
save the changes. The asset screen will be refreshed with the changes
and the modification has to be repeated.
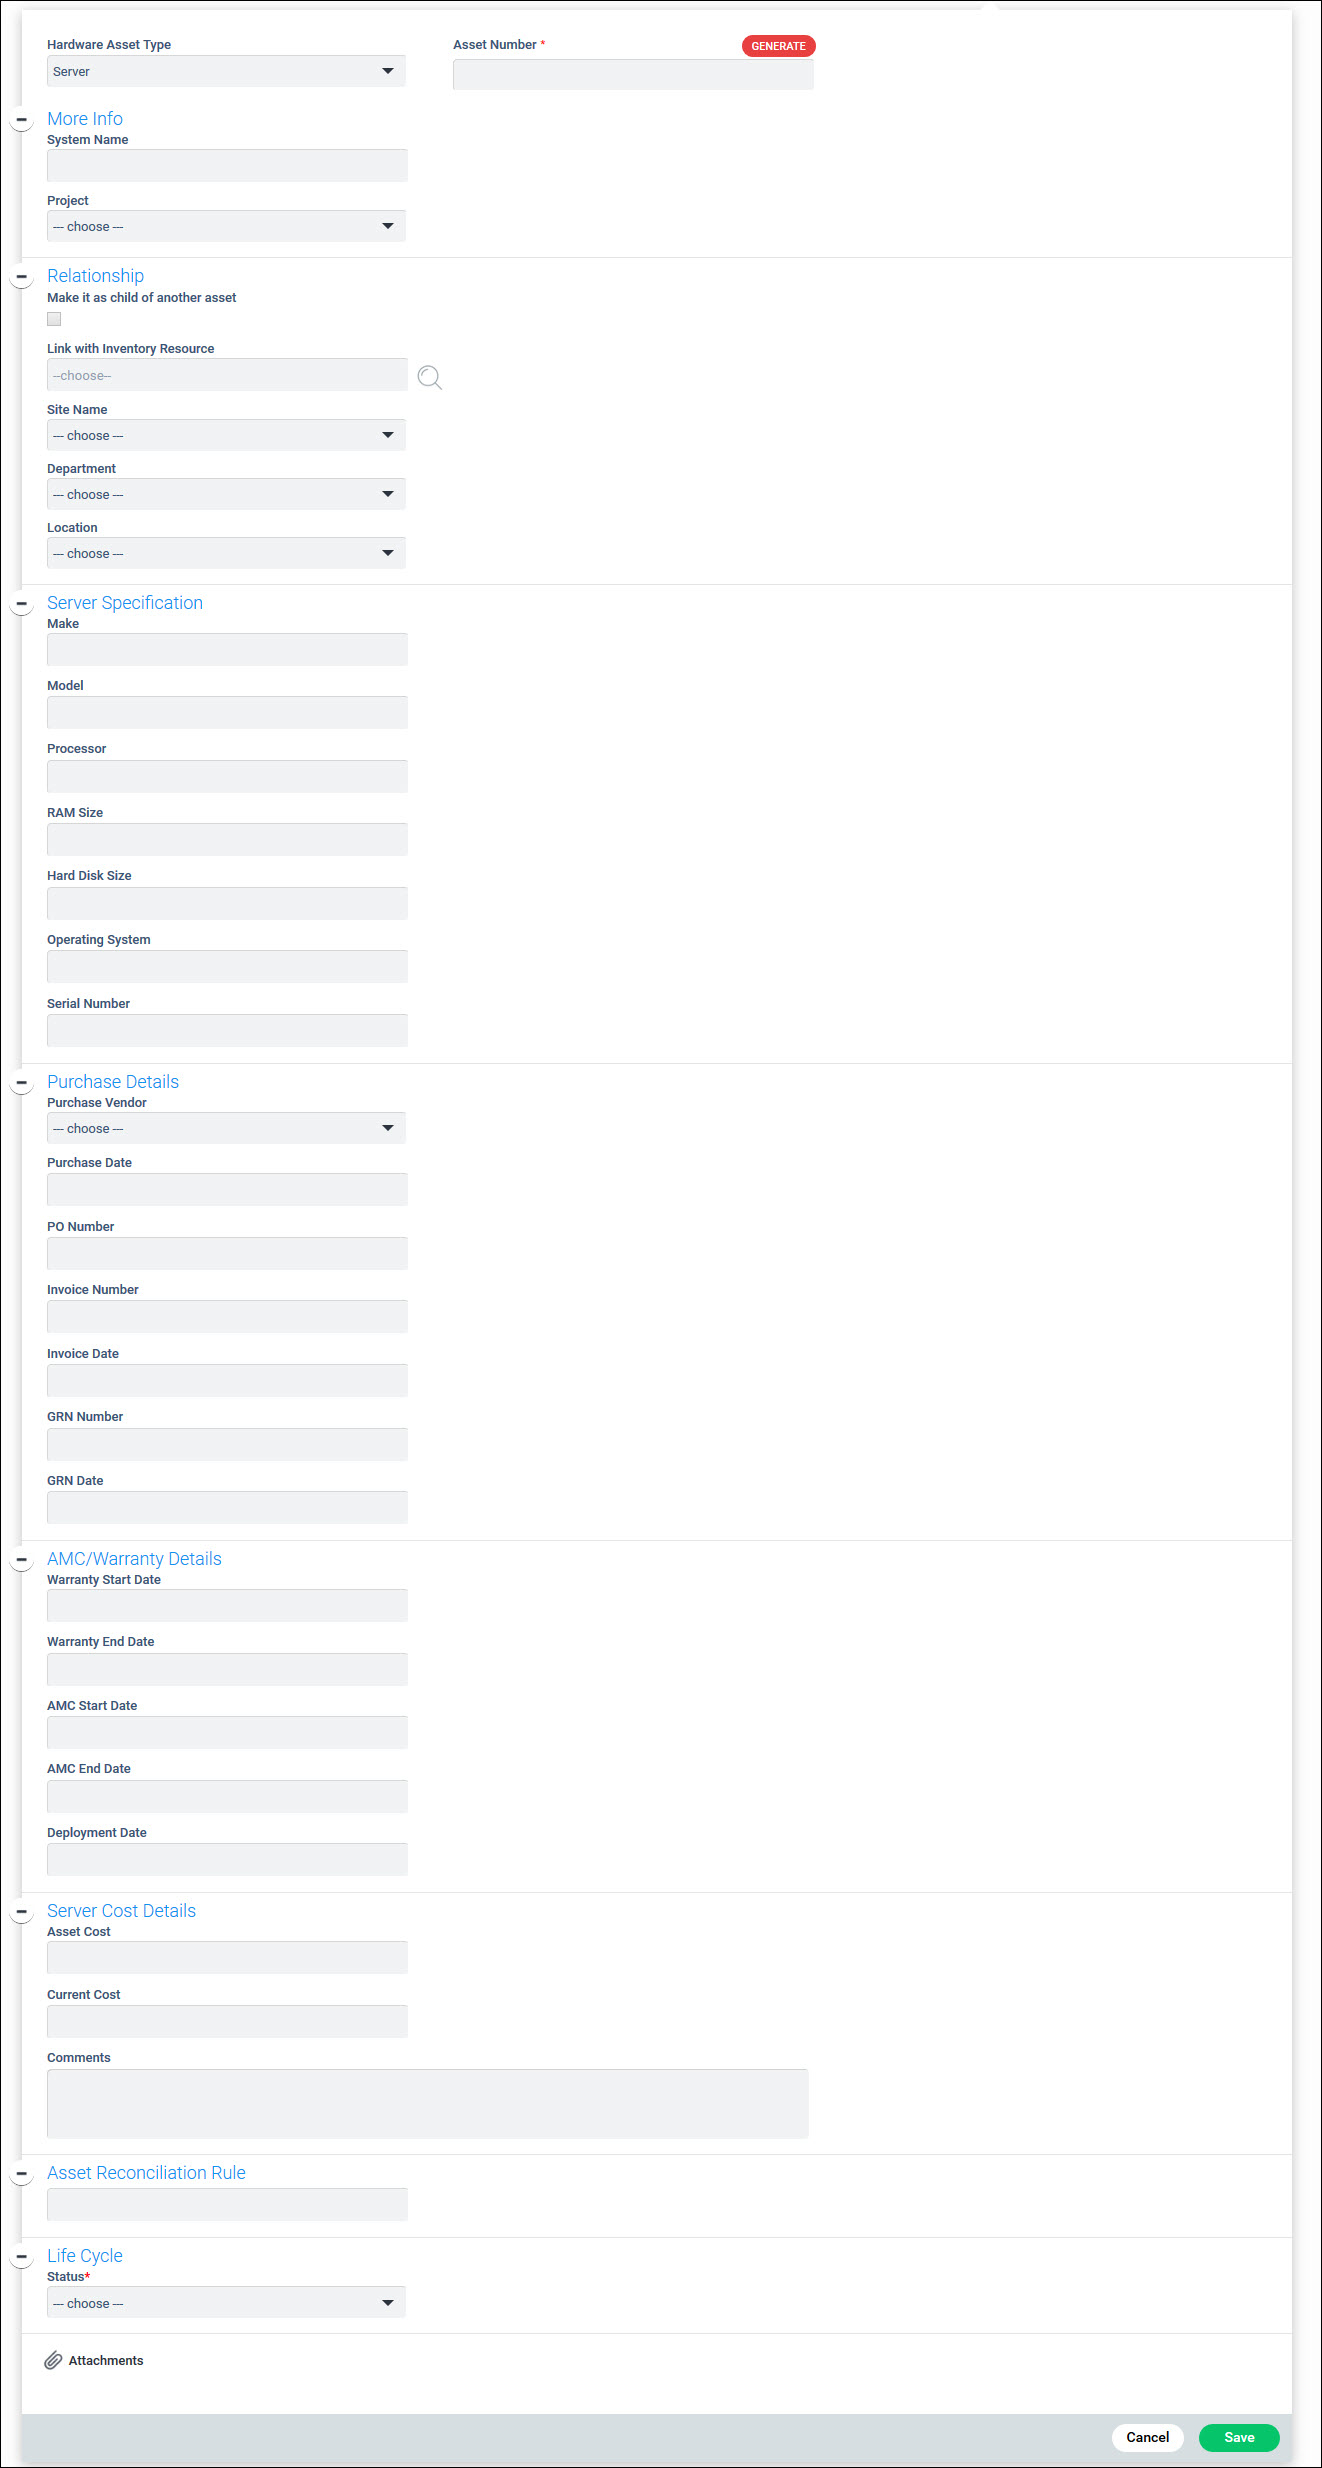
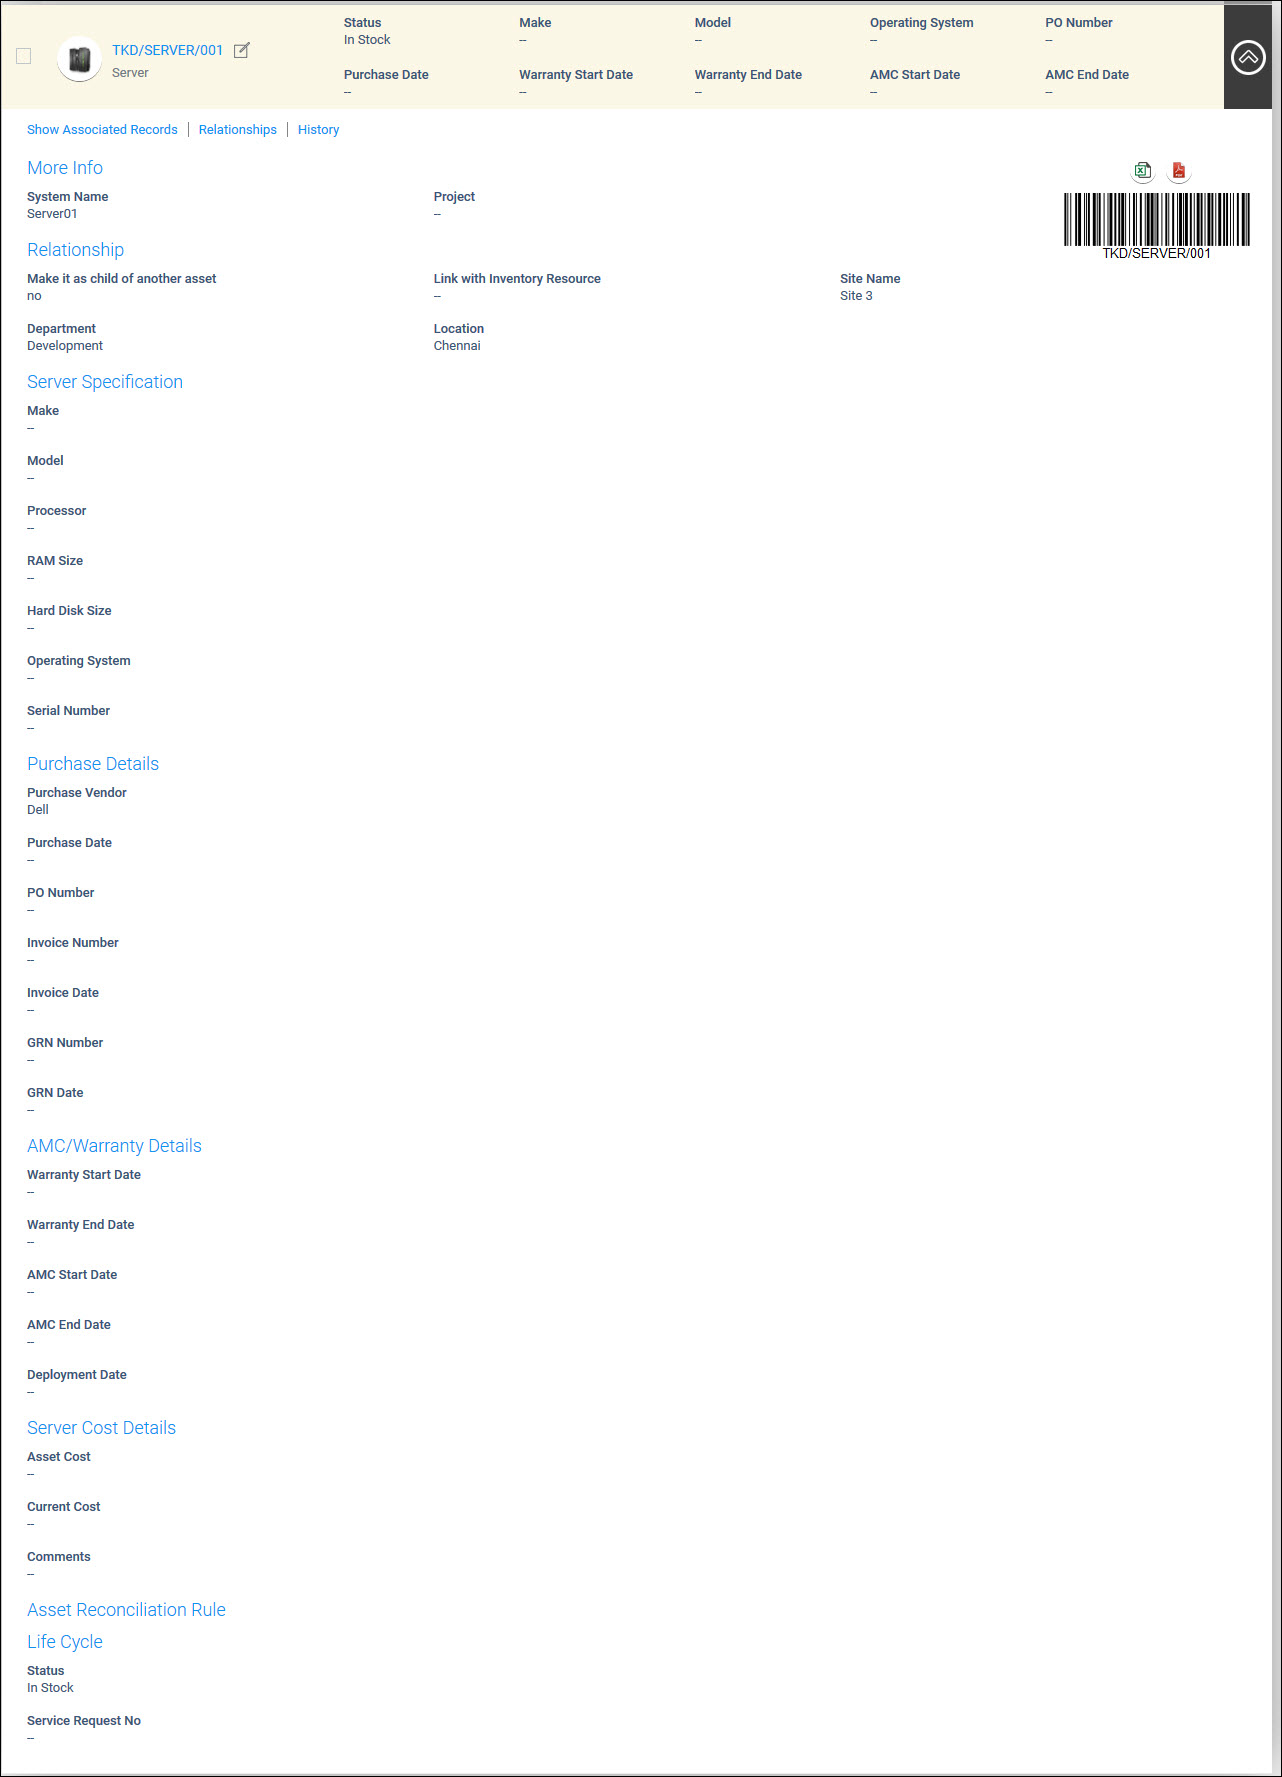
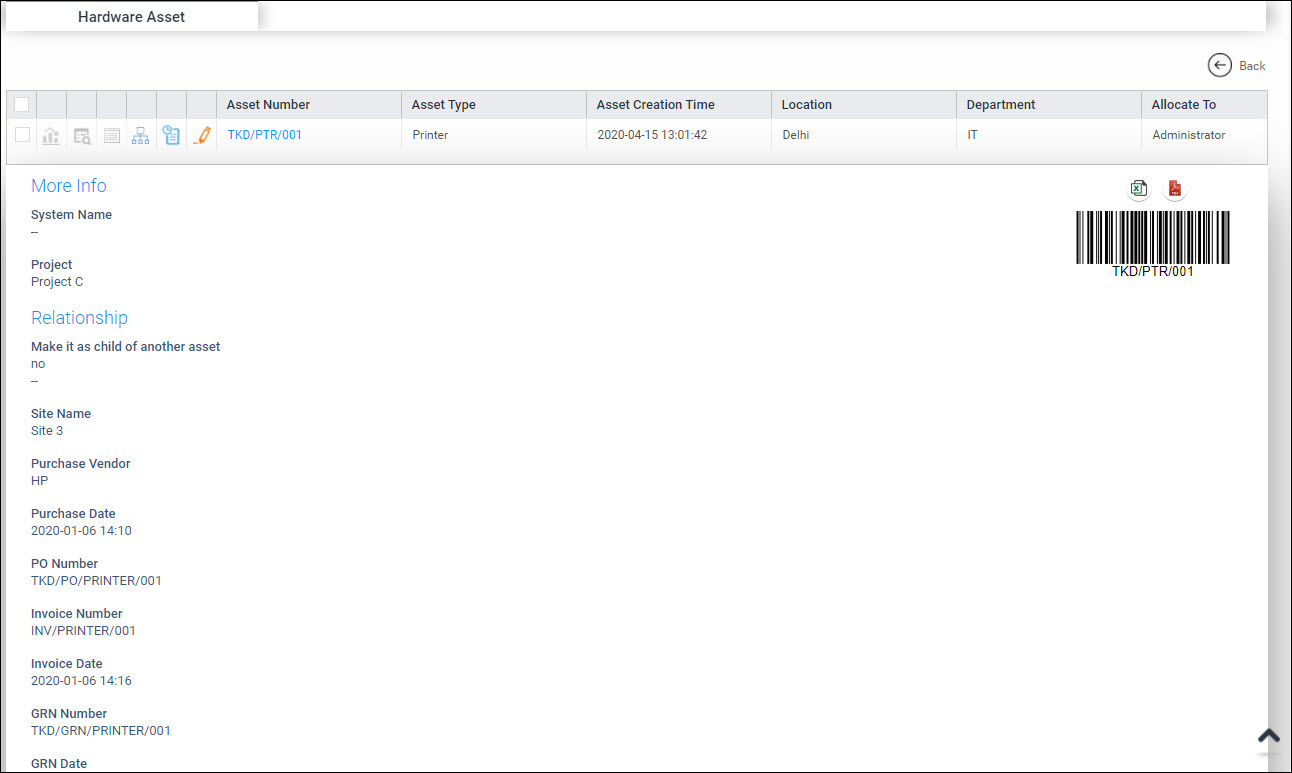
Click on  against the asset to expand the
asset details in the list view or click on the Asset Number in the
grid view. The details are expanded as shown.
against the asset to expand the
asset details in the list view or click on the Asset Number in the
grid view. The details are expanded as shown.
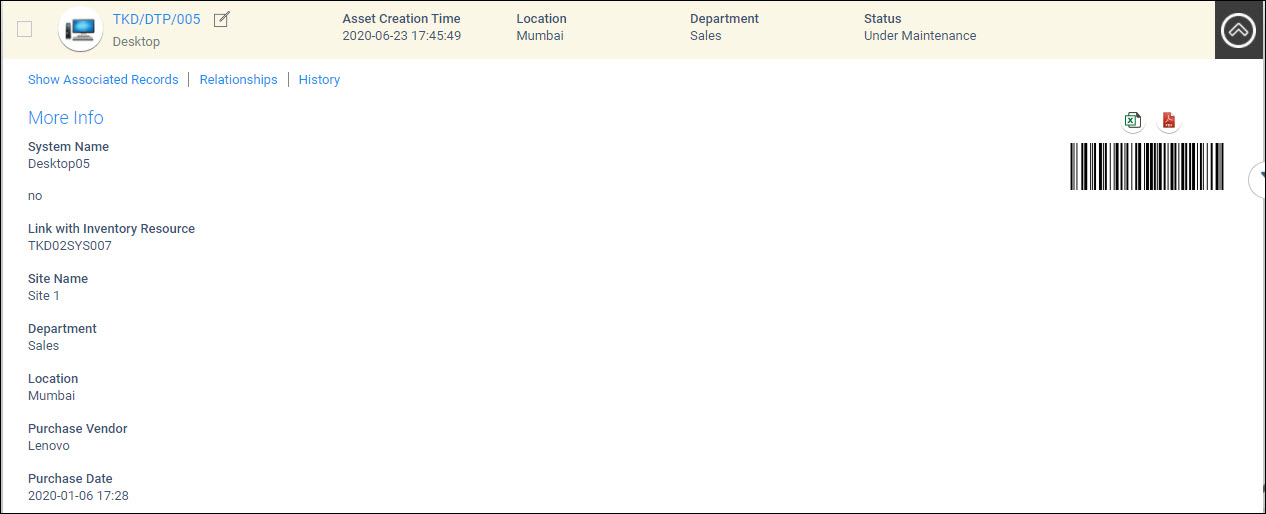
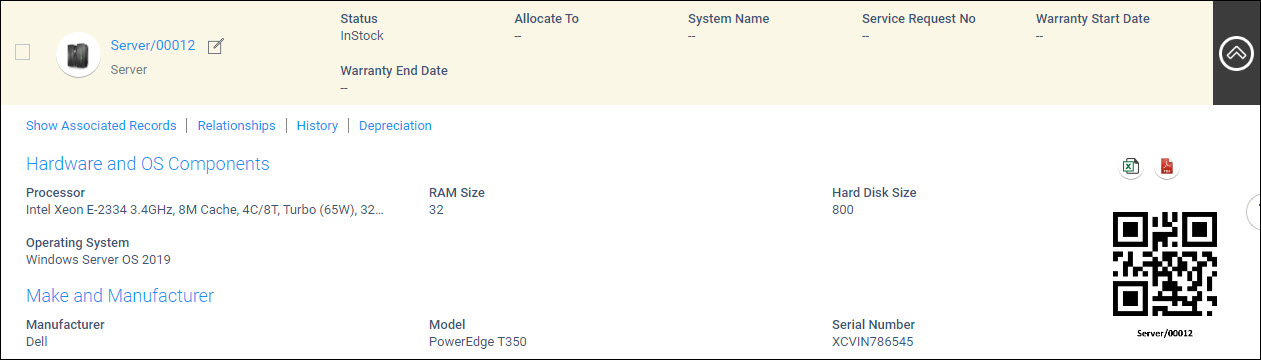
All the fields are displayed. On the right side, the bar code for the asset is displayed.
Click on  to export the asset details into
a PDF file.
to export the asset details into
a PDF file.
Click on ![]() to export the asset details into an Excel file.
to export the asset details into an Excel file.
Click on  to collapse
the view.
to collapse
the view.
There are a number of Asset actions which can be taken and these are shown in the top menu

The options are described in the table below in addition to the buttons on the right hand side of the listing view.
|
To add a new asset, click on the  button.
The attributes are described in the table below.
|
Click on 'Save' to add the asset.
Click on the asset. The Asset details are displayed.
To edit the asset details, click on  . Modify
the fields and click on 'Update'.
. Modify
the fields and click on 'Update'.
Click on 'Show Associated Records' on the asset details screen, to display the Service Desk records pertaining to the asset.
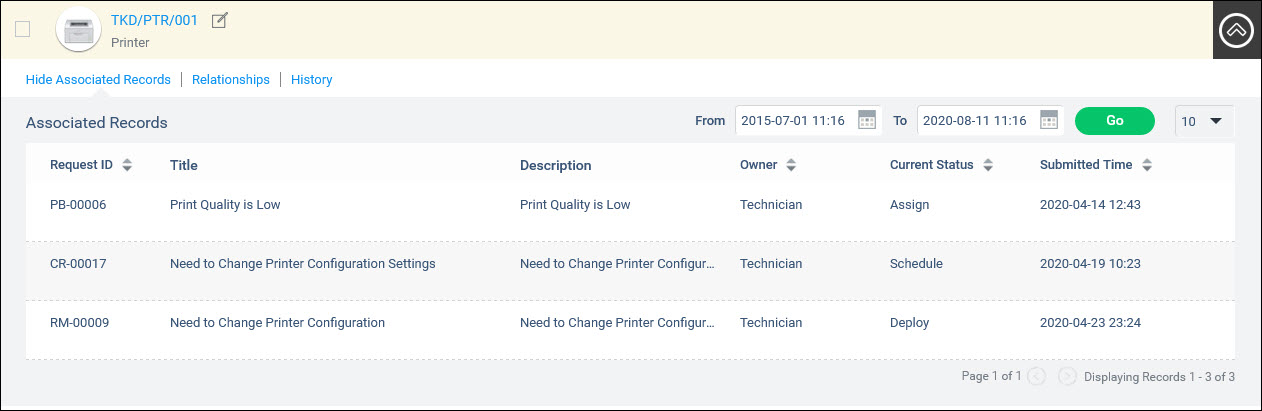
You can filter to view records for a particular period.
This option is used to configure the relationship between assets. An asset can be related/mapped to one more assets, contracts or CI. For example. a printer can be related/mapped to a desktop. Configuring the relationship helps in knowing the dependencies between the assets so that any impact can be known. For example, if a server is shut down then the dependent assets which could be applications could be viewed. In-turn if there are users defined as dependents for the application, they could be informed. Such relationships could be visualized in a tree view.
Click on 'Relationships' option.
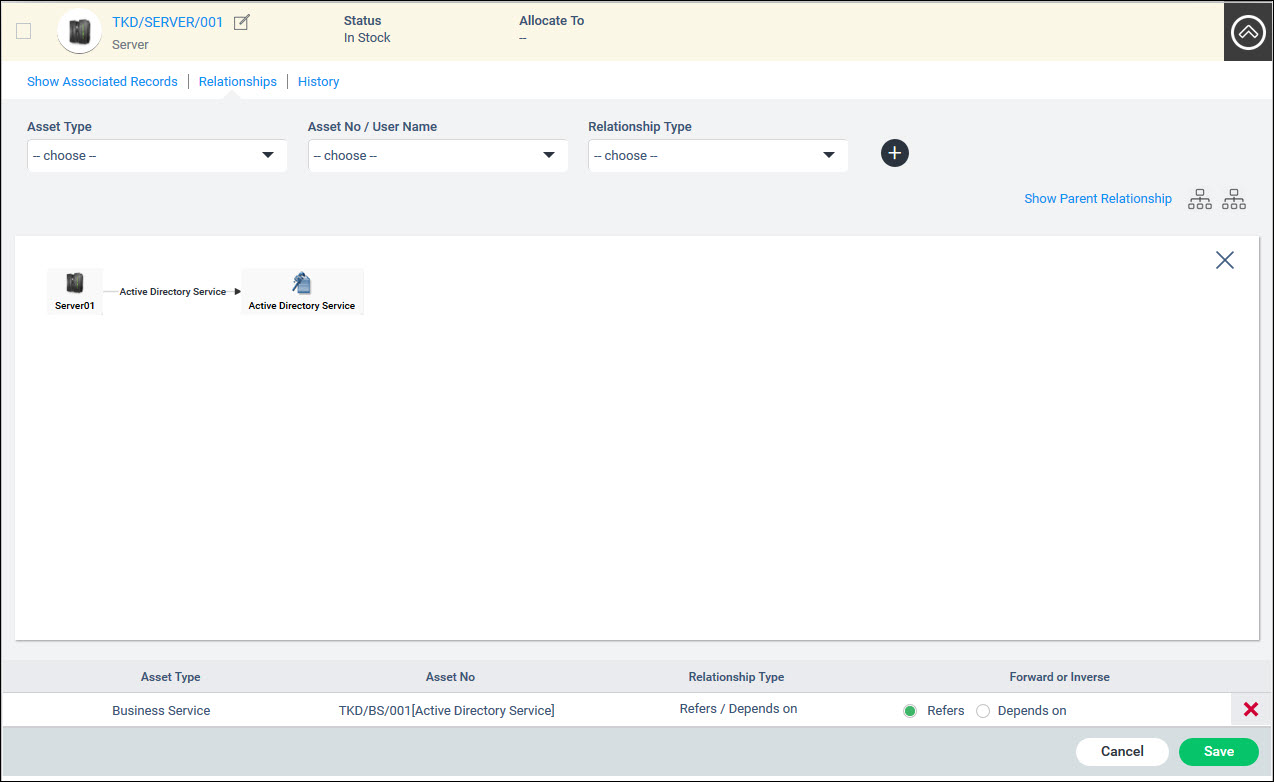
The fields are described below.
|
Click on 'Save' to save the relationship.
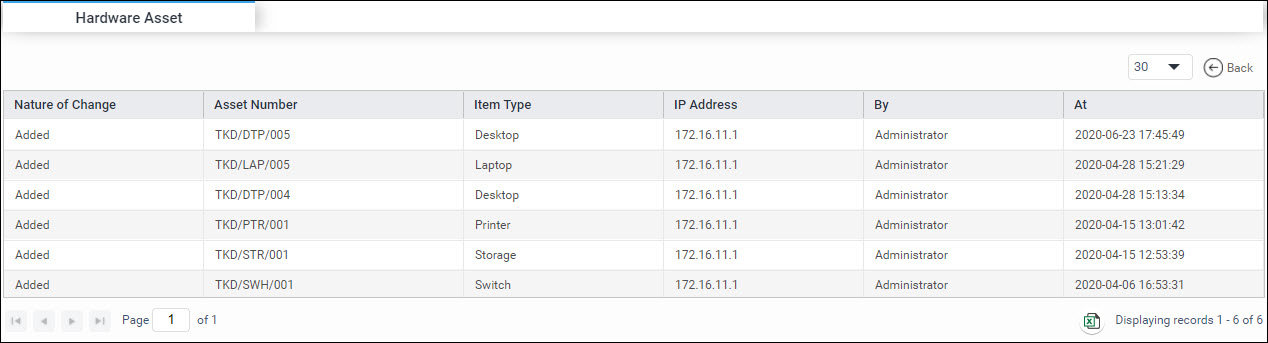
Click on 'History' to view the history of the asset.
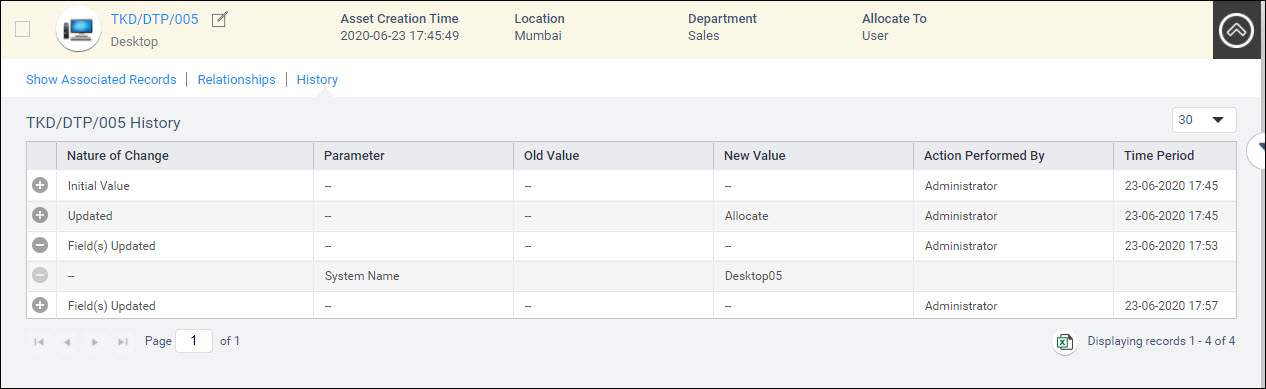
Click on the entry to expand or collapse the details of changes.
The nature of the change, the parameter changed along with old and new values, the action owner and time are displayed. The history also captures the acceptance or rejection of an asset by the allocated user.
The history of the asset can be exported into excel by clicking
on  icon.
icon.
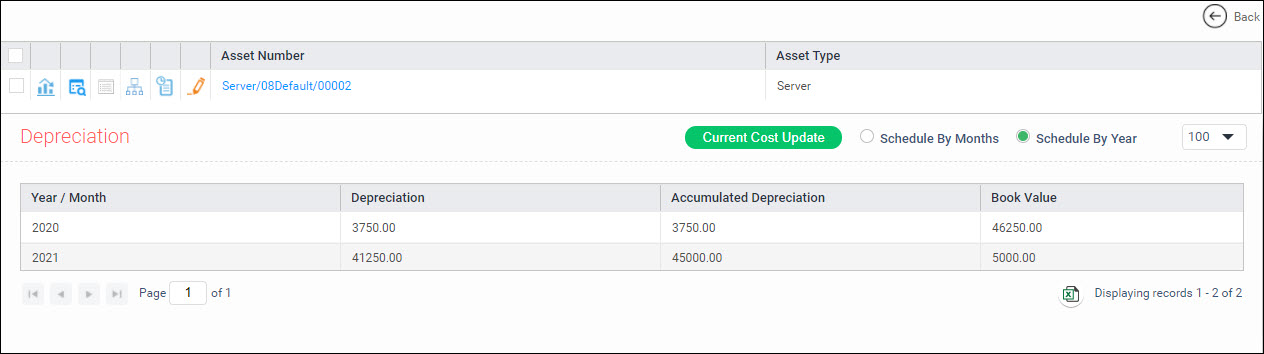
You can view the Depreciation details if enabled.
Click on 'Depreciation' to view the depreciation details. This option is visible only if depreciation is configured.
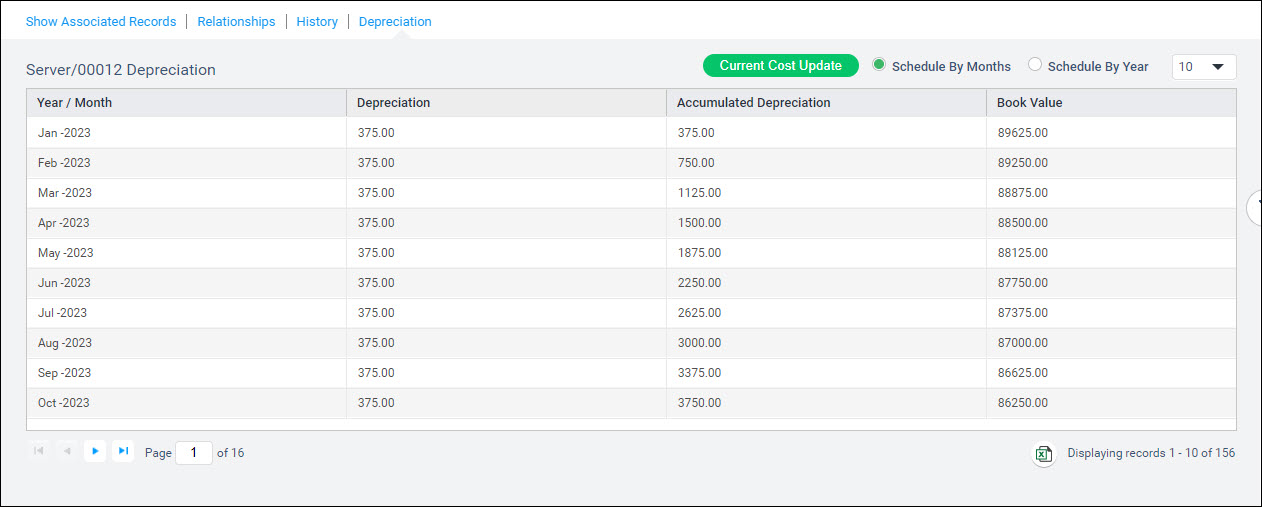
Select between 'Schedule by Months' or 'Schedule by Year' to get the monthly or annual depreciation.
Click on 'Current Cost Update' to replace the current cost by the Book value.
Click on
![]() to export the Depreciation
calculation to Excel.
to export the Depreciation
calculation to Excel.
Click on the option 'Change Status'.

Select the new status and click on 'Modify'.
SapphireIMS provides a facility to generate bar codes for assets. The bar code can be printed and physically placed on the asset. SapphireIMS supports a physical verification audit to be conducted on the asset using bar code scanner devices or the mobile application. For configuring the bar code refer to Settings->Assets and Inventory Management->Assets->Bar Code Configuration.
To search for assets based on bar code or to verify a bar code number, click 'Verify Barcode'.

Use a bar code scanner to scan the asset number or enter the bar code number (same as asset number) and click 'Verify'. The asset details are displayed and the status shows as green if the asset is verified.

Click on 'Change Status' to change the status of the asset.
If one or more attributes has to be changed for multiple assets, then a modify asset template can be created and used. Refer Settings->Asset and Inventory Management->Assets->Import Templates for details on Asset Import Templates.
Select one or more assets and click on 'Modify'.
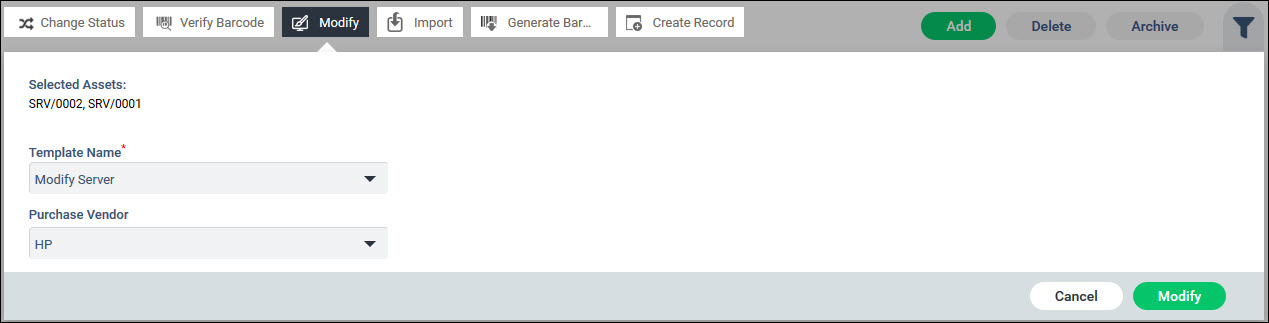
The assets are listed. Select the 'Template Name' to be used.
The attributes which have to be updated are displayed. Update the fields with the new values.
Click on 'Save'.
Instead of entering the entire details of the asset while creating manually especially when there is a large quantity of similar assets, a template can be created where much of the common information can be pre-filled. Once the asset is created, it can be updated to modify fields specific to the asset. Refer Settings->Asset and Inventory Management->Assets->Import Templates for details on Asset Import Templates.
Click on 'Import'. The asset import screen is displayed.

Select the 'Asset Type'. Click on 'Generate' to generate the asset number.
Select the 'Template Name' to select the template to use.
Click on 'Save' to create a new asset.
Select one or more assets. Click on 'Generate Barcode'.
A PDF file is generated with the barcodes. This can be saved or printed.
Note: The Global Settings
key 'Enable Service Desk Ticket Submission for Asset' must be set to 1
to enable this feature.
SapphireIMS provides a facility to create a Service Desk record for an asset and link it.
Click on 'Create Record'. The project selection screen is displayed.

Select a 'Project' from the list.
The Service Desk Record submission screen is displayed. Enter the fields and click on 'Save'. A record is created with the asset number linked to it.
The changes to Assets can be viewed in the Asset Audit Log.
Click on  on the right hand side of the screen.
The audit log is displayed.
on the right hand side of the screen.
The audit log is displayed.
The details of assets added, removed or updated are listed.
The audit log can be exported to excel by clicking on at the bottom of the screen.
The Grid View displays the asset information in a tabular format. The view can be customized. Assets can also be exported into an Excel spreadsheet and the steps are described in the next section.
Click the Grid View icon to view the asset listing in the form of a grid.

Click on 'Customize View' to customize the display of the fields that are listed. For details on customizing the view, refer Customizing the View.
The listing can be sorted on any column by clicking on the column name.
On clicking on any asset, the details of the asset is displayed. To open the asset in a new tab, hold the 'Ctrl' key while clicking on the asset.
Click on 'Back' to go back to the list view
To edit any
asset click on  . The asset details are displayed
and you can edit any field and update.
. The asset details are displayed
and you can edit any field and update.
To view the
history of an asset, click on  .
Refer to the section History
for details.
.
Refer to the section History
for details.
To add, modify
and view relationships, click on  . Refer to the
section Relationship
for details.
. Refer to the
section Relationship
for details.
To view associated
records, click on  . Refer
to the section Associated
Records for details.
. Refer
to the section Associated
Records for details.
To
view results of a physical audit, click on  . Refer
to the topic Physical
Asset Verification (PAV) for details.
. Refer
to the topic Physical
Asset Verification (PAV) for details.
To
view the depreciation calculation, click on  .
Refer to the section View
Asset Depreciation for details.
.
Refer to the section View
Asset Depreciation for details.
To customize the Grid View, click on 'Customize View' on the right hand side. The Customization screen is displayed.
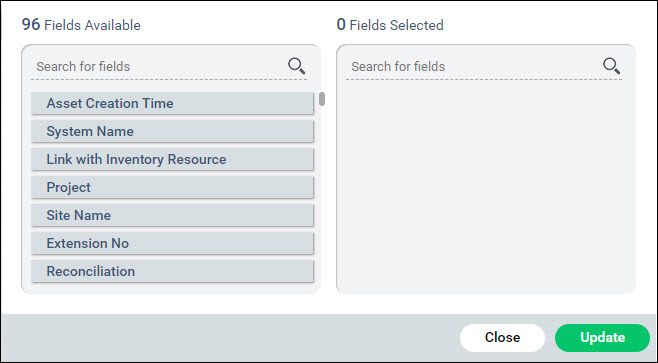
Select the fields you want displayed from the left side box and move it to the right side box.
Click on 'Update'.
You can export the Assets into an Excel spreadsheet in the Grid
view. Click on the ![]() button which is present at the
bottom of the grid view screen.
button which is present at the
bottom of the grid view screen.
The assets are exported into an Excel sheet and can be saved.
Note: This feature needs
to be enabled and the depreciation details configured in order to view
the calculation. Refer to Settings->Asset
and Inventory Management->Assets->Depreciation Scheduler for
details on the configuration.
Click on
against the asset in the grid view. The asset calculation details
are displayed.
Select between 'Schedule by Months' or 'Schedule by Year' to get the monthly or annual depreciation.
Click on 'Current Cost Update' to replace the current cost by the Book value.
Click on
![]() to export the Depreciation
calculation to Excel.
to export the Depreciation
calculation to Excel.

 to open
the search window.
to open
the search window. 