![]()
![]()
On successful login, the Service Desk Home screen is displayed. Depending on the configuration, the content of the Home screen could vary. The default home screen is a listing page containing the list of tickets as shown in the figure below. The Home screen can also be set to display a dashboard view.

The individual elements of the Home Page are described in detail below. For submission of records, you can proceed to the topic Service Desk->Basic Operations->Submit a Service Desk Record and for viewing records you can refer to the topic Service Desk->Basic Operations->Service Desk Records Listing.
On the top of the page, the Smart Search box is displayed as shown below.

You can type your issue into the Smart Search box. Based on keywords it recognizes, Smart Search looks for matching suggestions across Templates, Records, Knowledge Base, Repository and Service Catalogue in that order. The top 5 entries in each category will be displayed. You can select any entry top open the corresponding record or entry.
In the drop down box, you can select and unselect the categories in which you want the search to be done.
As an example if you start typing "print", Smart Search displays the following selection. Smart Search displays all matching 'Quick Templates' and in the order starting with the most used one. It then displays matching Incidents, Service Requests and the Service Catalogue.
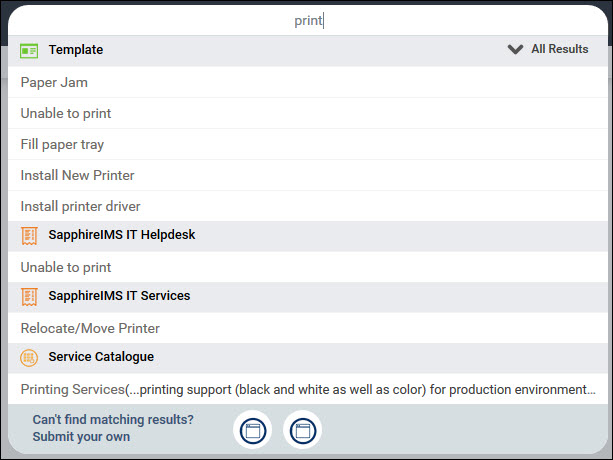
You can scroll through the entries and select any of the entries based on which is the closest in describing your issue. Alternatively you can click on the project icon which will display a blank template. For further details on submission of records refer to the topic Service Desk->Basic Operations->Submit a Service Desk Record.
The menu on the top of the page contains a number of buttons as shown below.

Each of the buttons are described below.
 Note: All the buttons may
not be visible since this is based on the permissions given for your role.
Note: All the buttons may
not be visible since this is based on the permissions given for your role.
|
To view announcements, click on the Announcement button if present. The Announcements are displayed.

Click on 'Yes, I got it' to mark the announcement as read.
You can use the left and right arrows to scroll through all the announcements.
If you hover the mouse on the left hand side, a panel appears and you can select among the options.
Note: If you do not have
the access permissions for a feature or the feature has not been configured
for your organization, the corresponding menu option will not be visible.

You can move up or down on the left hand menu and select any option. The options are described in the table below.
|
When you hover on the  icon in the left
hand panel, additional buttons are displayed. These are described
in the table below.
icon in the left
hand panel, additional buttons are displayed. These are described
in the table below.
|
This option allows you to set your profile information, change passwords and also set the delegation options.
Click on the Profile (Profile image) option. The following pop-up is displayed
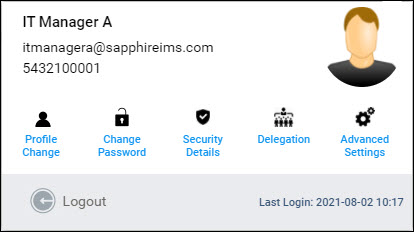
You can select 'Profile Change' for changing your profile details, 'Change Password' for changing your password, 'Delegation' for setting delegation options and 'Advanced Settings' for changing the home page preferences.
You can make changes to your profile if this is enabled in Service Desk. Refer to Enable Profile Changes for enabling or disabling profile changes. Select 'Profile Change' in the pop-up menu. The profile screen is displayed

The fields for the profile are described in the table below
|
Click on 'Save' to save the profile changes.
Note: If the Global Setting
'Hide current password and preferred contact method fields for AD Users'
is set to '1' then the 'Current Password' and 'Preferred Contact Method'
fields are not displayed.
To change the current password, click on the 'Change Password' option. The password screen is displayed.

Enter the 'Current Password' and the 'New Password'. Enter the fields and click on 'Save'. If Two Factor Authentication (TFA) is enabled, then you are prompted for a One Time Password which is either sent via SMS or E-mail.

Enter the 'One Time Password' and click on 'Submit'. You will see a confirmatory message if password change is successful.
If the OTP is not received, click on 'Resend OTP' to receive the OTP once again.
Note: Security Details should
be enabled in the configuration. Refer to Settings->User
Management->Security Settings for enabling Security Details feature.
SapphireIMS has additional security using a PIN and a Security Question/Answer which if enabled is used when the user forgets the password and has to be allowed to reset the password or the account gets locked and has to be unlocked.
The PIN and Security Question and Answer can be set by the user.
To set the Security Details, click on the 'Security Details' option. The following screen is displayed.

If the 'Secret Pin' is enabled, you are asked to enter the PIN. If Security Question is enabled, then the 'Secret Question' and 'Answer' is prompted. Enter the 'Current Password'.
Enter the fields and click on 'Save'.
If Two Factor Authentication (TFA) is enabled, then you are prompted for a One Time Password which is either sent via SMS or E-mail.
Enter the 'One Time Password' and click on 'Submit'. You will see a confirmatory message if password change is successful.
If the OTP is not received, click on 'Resend OTP' to receive the OTP once again.
Note: If the Global Setting
'Hide current password and preferred contact method fields for AD Users'
is set to '1' then the 'Current Password' field is not displayed.
SapphireIMS allows Service Desk Engineers (Technician Role) to delegate their access to other Service Desk Engineers for specific projects and specific periods of time. This is useful when an Engineer is unavailable for a period of time and another Engineer would be taking over the handling of records. Similarly Approval Managers can delegate access to other Engineers or Managers for the Technician and Approval Manager role respectively.
Note: Delegation should be
enabled in the configuration. Refer to Service
Desk->Settings->User/Role Management->Roles->Delegation.
Click on 'Delegation' option. An entry screen is displayed to select the Project.

Select the project. The Delegation entry screen is displayed.

Select the 'Technician' and/or 'Approval Manager', and pick the start and end times. Delegating Approval Manager role is only possible for those having Approval Manager role permissions. All records that are in the 'Assign' state between 'Start Time' and 'End Time' are delegated to the selected technician. Similarly if 'Approval Manager' is delegated, then all records in the 'Waiting for Approval' state between 'Start Time' and 'End Time' are delegated (owner of the ticket is changed) to the configured Approval Manager.
Click on 'Save'.
You can customize the home page based on your preferences.
Click on the 'Advanced Settings' option.
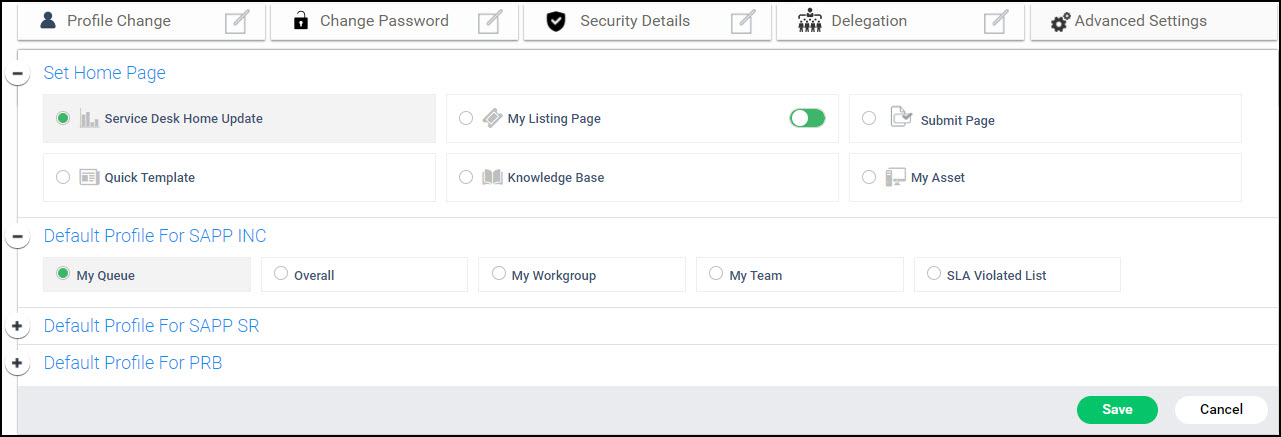
Select any of the options from among the following
|
Click on 'Save' to save the settings.
If you are using an evaluation license of SapphireIMS an alert message appears on the home page appears for anyone with Technician role who logs in, giving the license expiry date.

Contact SapphireIMS Sales if you want to extend the evaluation or purchase the license.
Note: This section is for
SapphireIMS Administrators.
To enable Profile Changes, go to Settings tab.
Click on 'Settings > Advanced System Settings > Global Settings'. Select 'Service Desk' category.
Select the setting key 'Enable or Disable Profile Change'. The setting screen is displayed.

Set the value as '1' or '0' to enable or disable the setting and click on 'Update'.
You can also enable users to select Date/Time formats by setting a key. Select the setting key 'Enable or Disable DateTime Format field'. The setting screen is displayed.

Set the value as '1' or '0' to enable or disable the setting and click on 'Update'.


 and set the filter appropriately (by default the Time scale is
Today). To open any record in a new tab, press Control key and
click on the record.
and set the filter appropriately (by default the Time scale is
Today). To open any record in a new tab, press Control key and
click on the record. 


