![]()
![]()
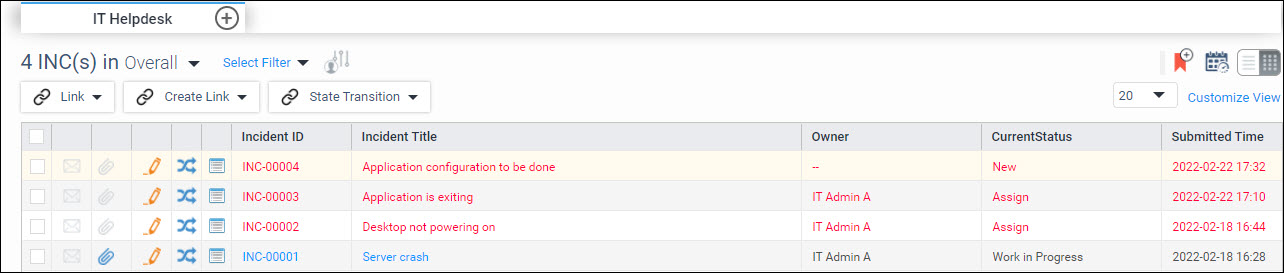
This topic describes the Service Desk Records listing view. When you login to SapphireIMS, by default the records are listed in the List View. You can switch to a Grid View which is described later.
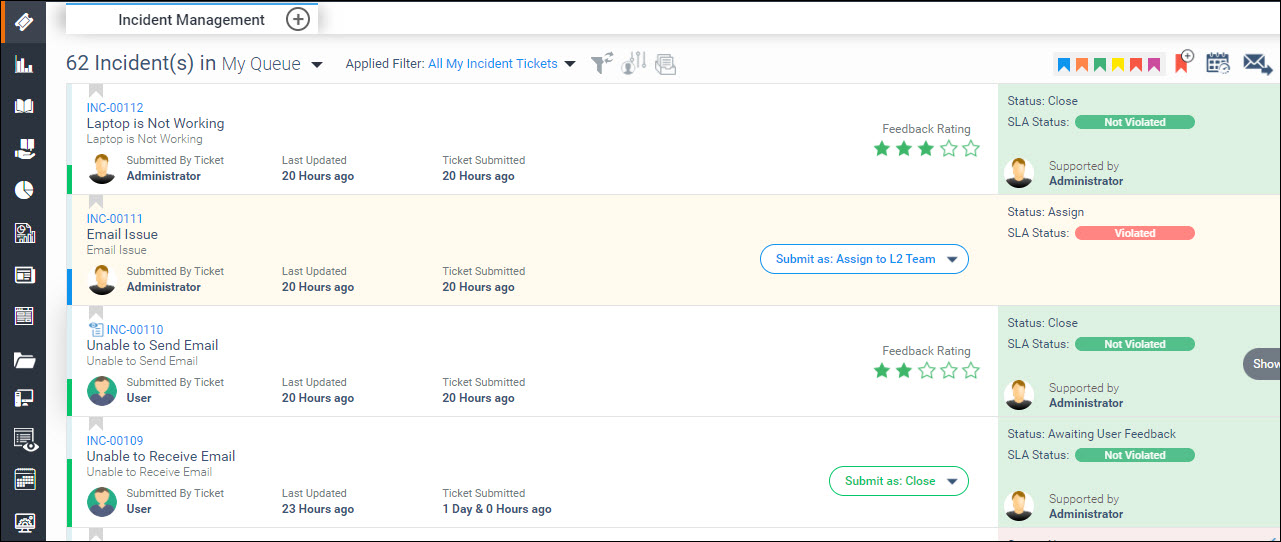
To view or edit the record details, click on the record.
To view the Emails
sent or received for the record, click on  on the
right hand side against the record. This icon is displayed only if
there are Emails available for the record.
on the
right hand side against the record. This icon is displayed only if
there are Emails available for the record.
The list of projects for which you have access are displayed in the left hand menu panel under 'Processes'. To view records in a particular project, click on the particular project. This displays the records in the List View as shown above.
Records are aggregated into groups and you can select whichever grouping you want. By default 'My Queue' is selected, which displays all records for which you are the owner or submitter. To change the group, click on the arrow and a drop down is displayed.
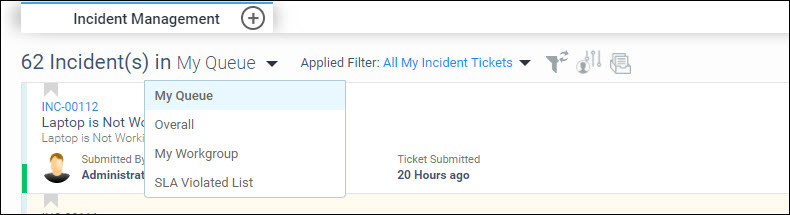
Select any group. Note that you may not be able to view all groups as these are dependent on the access permissions you have for your role.
|
You
can filter the records to display only those records which meet the
filter criteria. In order to open the Filters, click on  icon on the right hand
side. This expands the Filter menu. Refer to the section Creating Filters for more information.
icon on the right hand
side. This expands the Filter menu. Refer to the section Creating Filters for more information.
The 'Select Filter' drop down allows you to select a profile and apply it.
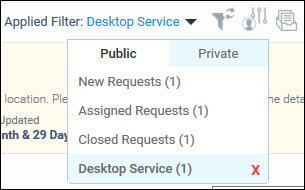
Click on the tabs 'Public' or 'Private' to select among the profiles. Note that this option does not appear for anyone mapped to a user role.
There are some pre-shipped profiles which cannot be deleted. Profiles created by users can be deleted.
The pre-set filters shipped with the product include filters for 'New', 'Assigned' and 'Closed' records. If the role configuration for the logged-in user is enabled to view 'All records' this filter also appears.
Click
on  to clear the applied filter.
Click
on  to set the selected filter as default for this
project.
to set the selected filter as default for this
project.
Custom views can be set up with access controlled by roles. Refer to Service Desk->General Settings->Custom Views for details.
 Note: Users who are mapped
to a user role in the project, cannot save any profiles. They only apply
the filters for use in the session and cannot save them.
Note: Users who are mapped
to a user role in the project, cannot save any profiles. They only apply
the filters for use in the session and cannot save them.
In the record listing view, in each of the groupings, you can set search profiles which act like filters and allow you to view only those records which satisfy the filter criteria. Follow the steps below to set filters.
Click
on the filter button on the right side
and this expands the filter selection screen shown below.

Select the filters values for each of the parameters. Apart from the fixed fields in the record, you can also select to view only primary or child or all records. The values in the drop-down appear alphabetically.
Click
on  to expand the custom filter options and allows
you to choose among the additional fields also.
to expand the custom filter options and allows
you to choose among the additional fields also.
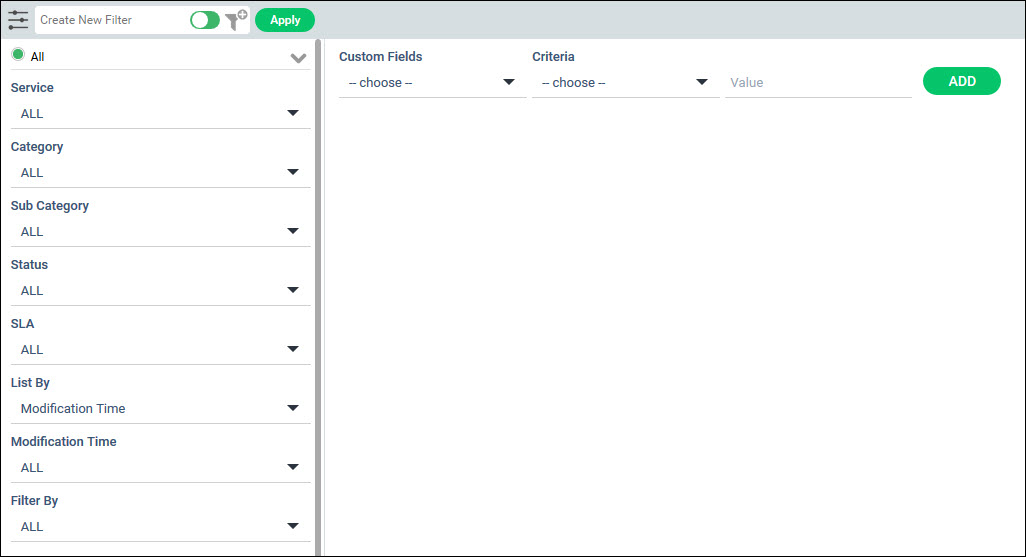
Select any custom field, the criteria and value. Click on 'ADD' to add the filter.
Once the filter values are selected, if you want to apply it temporarily click on 'Apply'.
To save and create the filter, enter a filter name,
Use the slider to select between 'Public' and 'Private' filters while saving. Private filters can be created by you for your use only. Note that the privilege to save the search profile and publish to others is restricted based on the project settings.
Click on  .
.
A confirmation message is displayed. The filter appears in the 'Select Filter' drop down list in the listing view.
To
modify a filter, apply the filter by clicking on 'Select
Filter'. Next click on the filter button
to expand the filter screen. Update the filter settings and click
on  .
.
Note: The record search filters
can only be edited or deleted by the user who has created the profile.
If the filter is Public, other users can only use the search profile.
Also note that profiles created here cannot be restricted to specific
roles for access. For controlling access to profiles, custom views need
to be created by the Project Administrator.
Select the 'SLA Violated List' option to filter the SLA violated records for viewing.
Click on
to open the filter menu. You can set filters based on SLA parameters
and filter records.
On the top right hand side the following icons are displayed.

Each of the icons is described below.
|
The Grid View displays the record information in a tabular format. The view can be customized. Records can also be exported into an Excel spreadsheet and the steps are described in the next section.
Click the Grid View icon to view the record listing in the form of a grid.
Click on 'Customize View' to customize the display of the fields that are listed. The following screen is displayed with selection boxes to select the fields which are to be displayed.
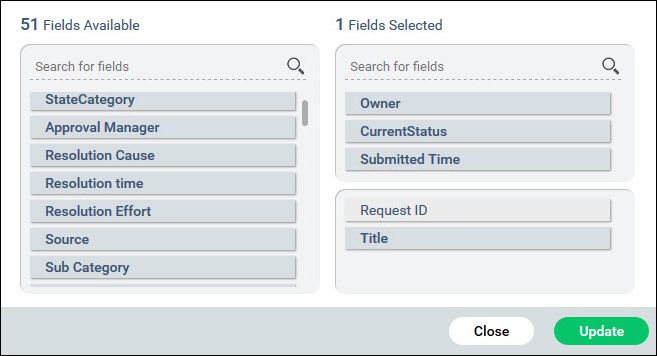
Select a field in the left list box and drag it to drop it in the upper right list box. The fields displayed in the left list box are displayed in the grid view listing of the service desk records. There is provision to display one field below the Request ID (which is fixed). To display a second field below the Request ID, drag any field to the lower right list box. If there are more fields than can be displayed on the screen, a scroll bar appears to scroll the page to the right or left. The Request ID column (and any field below it on the second line) will be frozen in the view.
Click 'Update' to save the changes.
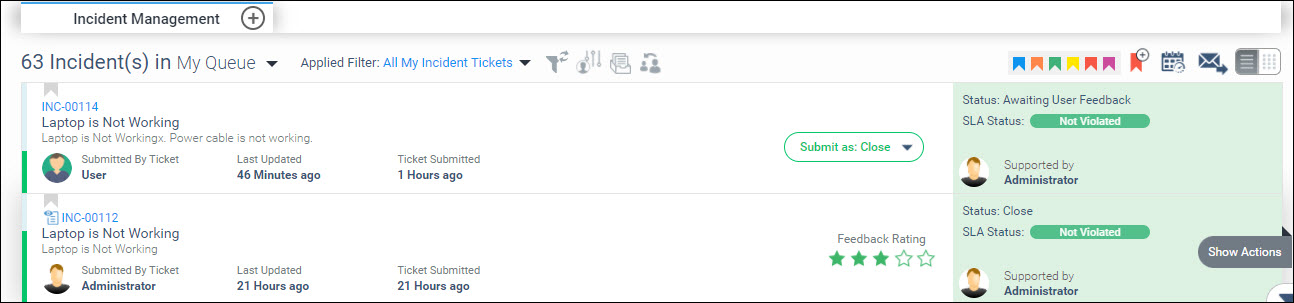
On clicking on any record, the details of the record is displayed. To open the record in a new tab, hold the 'Ctrl' key while clicking the record.

Click on 'Back' to go back to the list view.
You can also quickly
view the record details by clicking on  .
.
To edit any record
click on  . The record details are displayed and
you can edit any field and update.
. The record details are displayed and
you can edit any field and update.
To change the state
of a single record, click on  .
Select the new state, enter a comment and click on 'Confirm'.
.
Select the new state, enter a comment and click on 'Confirm'.
The icon  indicates there are unread
mails. Click on it to go to the mails for the record. The icon
indicates there are unread
mails. Click on it to go to the mails for the record. The icon  indicates
a failure in sending an outgoing mail.
indicates
a failure in sending an outgoing mail.
To link records or
to create a new link, select a record and click on either ![]() or
or ![]() . For more details on
linking records, refer Service
Desk->Service Desk Common Features->Linking Records.
. For more details on
linking records, refer Service
Desk->Service Desk Common Features->Linking Records.
You can change the
state of records in bulk using the bulk state transition option ![]() . Refer to Service Desk->Service Desk
Common Features->Bulk State Transition for the steps.
. Refer to Service Desk->Service Desk
Common Features->Bulk State Transition for the steps.
To set bookmarks for
records, select the records and click on Bookmark option ![]() .
Refer to Service Desk->Service Desk Common Features->Bookmarks
for the steps.
.
Refer to Service Desk->Service Desk Common Features->Bookmarks
for the steps.
In the Grid view you can set the number of records to be listed on each page and move across pages using the forward and back arrows.
Note: If any mandatory field
is missing which could be the case when the record is created through
E-mail, SMS or using the API, an alert is displayed to update the missing
information and state change cannot proceed.
You can export the Service Desk Records into an Excel spreadsheet
in the Grid view. Click on the ![]() button
which is present at the bottom of the grid view screen.
button
which is present at the bottom of the grid view screen.
The records are exported into an Excel sheet and can be saved.
Refer to the topic Changing the Owner of the Record to enable this feature.
When the ownership of the record is changed, there is a facility
for the previous owner to view the records. On the records listing
view, click on  .
.
The list of records whose ownership has changed is displayed.
Refer to the topic Changing the Approval Manager to enable this feature.
When the Approval Manager of the record is changed, there is
a facility for the previous Approval Manager to continue to be able
to view the records after logging in to SapphireIMS. On the records
listing view, click on  icon.
icon.

The list of records whose Approval Manager has changed is displayed.

 )
to view the book marked records.
)
to view the book marked records.


